Разработка игр HTML5 | Бесконечная прокрутка фона
Дизайн и разработка игр - это развивающаяся отрасль. Хотя создание AAA-игр потребует глубоких знаний игровых движков, DirectX, OpenGL и т. Д., Небольшие проекты видеоигр HTML5 - хорошее место для начала.
HTML5 Canvas и javascript можно использовать для создания небольших игр, изучая основы разработки игр, такие как обнаружение столкновений, пулы объектов и т. Д.
Бесконечная прокрутка фона
Бесконечно прокручиваемый фон - важный инструмент, который необходим при создании бесконечных аркадных игр, таких как flappy bird, или в обычном платформере, где у вас нет времени или ресурсов для ручного создания всего уровня.
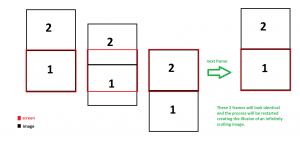
Идея состоит в том, чтобы нарисовать одно и то же изображение дважды подряд и заменить второе изображение первым, когда оно займет весь экран, эффективно перезапустив процесс.
Рисование изображения
Изображение должно быть таким, чтобы промежуточные кадры с частями двух изображений были правильным фоном, а разделительная линия не была видна. Та же самая логика может быть применена для создания бесконечного фона с боковой прокруткой.
Здесь мы будем использовать это космическое фоновое изображение в качестве примера:
spacebg.png
Это было сделано с помощью MS Paint. Можно использовать любое другое программное обеспечение, такое как Photoshop или Gimp.
Написание кода
HTML:
<!DOCTYPE html> <html> <head> <title>Infinitely Scrolling Background</title> </head> <body style="background-color: black;"> <canvas id="canvas1" style="border: 1px solid black;"></canvas> </body> </html> <script src="main_javascript.js"></script> |
JavaScript:
// inside main_javascript.js var can = document.getElementById("canvas1"); // The 2D Context for the HTML canvas element. It// provides objects, methods, and properties to draw and// manipulate graphics on a canvas drawing surface.var ctx = can.getContext("2d"); // canvas width and heightcan.width = 600;can.height = 600; // create an image elementvar img = new Image(); // specify the image source relative to the html or js file// when the image is in the same directory as the file// only the file name is required:img.src = "spacebg.png"; // window.onload is an event that occurs when all the assets// have been successfully loaded( in this case only the spacebg.png)window.onload = function() { // the initial image height var imgHeight = 0; // the scroll speed // an important thing to ensure here is that can.height // is divisible by scrollSpeed var scrollSpeed = 10; // this is the primary animation loop that is called 60 times // per second function loop() { // draw image 1 ctx.drawImage(img, 0, imgHeight); // draw image 2 ctx.drawImage(img, 0, imgHeight - can.height); // update image height imgHeight += scrollSpeed; // reseting the images when the first image entirely exits the screen if (imgHeight == can.height) imgHeight = 0; // this function creates a 60fps animation by scheduling a // loop function call before the // next redraw every time it is called window.requestAnimationFrame(loop); } // this initiates the animation by calling the loop function // for the first time loop(); } |
Methods and Events
- getContext(‘2d’) : The HTML5 canvas tag is used to draw graphics via scripting (usually JavaScript).
However, the canvas element has no drawing abilities of its own (it is only a container for graphics) – you must use a script to actually draw the graphics.
The getContext() method returns an object that provides methods and properties for drawing on the canvas.
Syntax:varctx = document.getElementbyId("canvasid").getContext("2d");The getContext(“2d”) object can be used to draw text, lines, boxes, circles, and more – on the canvas.
- window.onload : The onload event occurs when an object has been loaded. It is commonly used in javascript to trigger a function once an asset has been loaded.
Syntax:object.onload =function() {/*myScript*/};window.onload specifically occurs on the successful load of all assets hence most of the javascript animation and rendering code for games are often written completely inside a function triggered by window.onload to avoid problems such as the drawImage() function being called before the image has been loaded.
(try using a heavier image and calling the drawImage() function outside window.onload=function(){..} )It can also be used to check the visitor’s browser type and browser version, and load the proper version of the web page based on the information.
- window.requestAnimationFrame() : The window.requestAnimationFrame() method tells the browser that you wish to perform an animation and requests that the browser call a specified function to update an animation before the next repaint. The method takes a callback as an argument to be invoked before the repaint.
You should call this method whenever you’re ready to update your animation onscreen. This will request that your animation function be called before the browser performs the next repaint. The number of callbacks is usually 60 times per second, but will generally match the display refresh rate in most web browsers as per W3C recommendation.
Syntax:window.requestAnimationFrame(callback_function);The callback_funtion is passed a single argument, a DOMHighResTimeStamp, which indicates the current time when callbacks queued by requestAnimationFrame() begin to fire.
Note: Your callback routine must itself call requestAnimationFrame() if you want to animate another frame at the next repaint.
Final Animation
The final canvas animation should look like this when the html file is opened :
