Проверка номера телефона с помощью Firebase в Android
Номер телефона Аутентификация Firebase используется для входа пользователя путем отправки SMS-сообщения на телефон пользователя. Пользователь входит в систему, используя одноразовый код, содержащийся в SMS-сообщении. Пример видео приведен ниже, чтобы получить представление о том, что мы собираемся делать в этой статье. Обратите внимание, что мы собираемся реализовать этот проект на языке Kotlin .
Note: To implement this in Java language refer to this article Firebase Authentication with Phone Number OTP in Android
Пошаговая реализация
Шаг 1: Создайте новый проект
Чтобы создать новый проект в Android Studio, обратитесь к разделу «Как создать/запустить новый проект в Android Studio». Обратите внимание, что выберите Kotlin в качестве языка программирования.
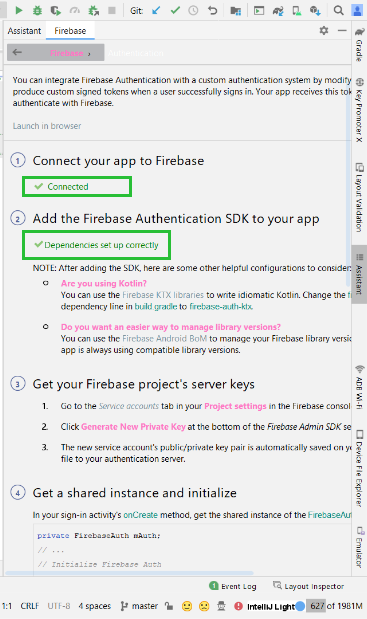
Шаг 2: Подключите проект к Firebase.

Шаг 3: Добавьте зависимость в файл build.gradle и нажмите «Синхронизировать сейчас».
implementation platform(‘com.google.firebase:firebase-bom:26.5.0’)
implementation ‘com.google.firebase:firebase-auth-ktx’
Шаг 4: Создайте два новых действия.
Создайте два новых действия. Один PhoneNumberActivity.kt с файлом макета activity_phone_number.xml для ввода номера телефона и запуска процесса аутентификации. Второй OtpActivity.kt с файлом макета activity_otp.xml для ввода OTP, полученным от firebase.
Шаг 5: Работа с макетом
Работа с activity_phone_number.xml . Перейдите к файлу activity_phone_number.xml и напишите следующий код.
XML
<?xml version="1.0" encoding="utf-8"?><androidx.constraintlayout.widget.ConstraintLayout android:layout_width="match_parent" android:layout_height="match_parent" tools:context=".PhoneNumberActivity"> <!--This will be used to enter the phone number--> <EditText android:id="@+id/et_phone_number" android:layout_width="match_parent" android:layout_height="wrap_content" android:layout_marginStart="20dp" android:layout_marginTop="200dp" android:layout_marginEnd="20dp" android:layout_marginBottom="20dp" android:ems="10" android:hint="Enter Phone Number" android:inputType="phone" app:layout_constraintEnd_toEndOf="parent" app:layout_constraintStart_toStartOf="parent" app:layout_constraintTop_toTopOf="parent" tools:layout_editor_absoluteY="85dp" /> <!--On click of this button OTP will be send to phone--> <Button android:id="@+id/button_otp" android:layout_width="wrap_content" android:layout_height="wrap_content" android:layout_marginTop="20dp" android:text="Send OTP" app:layout_constraintEnd_toEndOf="parent" app:layout_constraintStart_toStartOf="parent" app:layout_constraintTop_toBottomOf="@+id/et_phone_number" /> </androidx.constraintlayout.widget.ConstraintLayout> |
Работа с activity_otp.xml. Перейдите к файлу activity_otp.xml и напишите следующий код.
XML
<?xml version="1.0" encoding="utf-8"?><androidx.constraintlayout.widget.ConstraintLayout android:layout_width="match_parent" android:layout_height="match_parent" tools:context=".OtpActivity"> <TextView android:id="@+id/tv_otp" android:layout_width="wrap_content" android:layout_height="wrap_content" android:layout_marginTop="200dp" android:text="Enter OTP" android:textSize="20sp" app:layout_constraintLeft_toLeftOf="parent" app:layout_constraintRight_toRightOf="parent" app:layout_constraintTop_toTopOf="parent" /> <!--We will use it to enter OTP after we receive OTP--> <EditText android:id="@+id/et_otp" android:layout_width="match_parent" android:layout_height="wrap_content" android:layout_margin="20dp" android:hint="Enter OTP" app:layout_constraintLeft_toLeftOf="parent" app:layout_constraintRight_toRightOf="parent" app:layout_constraintTop_toBottomOf="@id/tv_otp" /> <!--On click of this button final authentication will start--> <Button android:id="@+id/login" android:layout_width="wrap_content" android:layout_height="wrap_content" android:text="Login" app:layout_constraintLeft_toLeftOf="parent" app:layout_constraintRight_toRightOf="parent" app:layout_constraintTop_toBottomOf="@id/et_otp" /></androidx.constraintlayout.widget.ConstraintLayout> |
Работа с activity_main.xml . Перейдите к файлу activity_main.xml и напишите следующий код. Это последнее действие, которого мы достигаем после завершения проверки.
XML
<?xml version="1.0" encoding="utf-8"?><androidx.constraintlayout.widget.ConstraintLayout android:layout_width="match_parent" android:layout_height="match_parent" tools:context=".MainActivity"> <TextView android:layout_width="wrap_content" android:layout_height="wrap_content" android:text="Welcome To GFG!!" android:textSize="22sp" android:textColor="@color/black" app:layout_constraintBottom_toBottomOf="parent" app:layout_constraintLeft_toLeftOf="parent" app:layout_constraintRight_toRightOf="parent" app:layout_constraintTop_toTopOf="parent" /></androidx.constraintlayout.widget.ConstraintLayout> |
Шаг 6: Работа с файлом PhoneNumberActivity.kt
Перейдите к файлу PhoneNumberActivity.kt и обратитесь к следующему коду. Ниже приведен код файла PhoneNumberActivity.kt . Комментарии добавляются внутри кода, чтобы понять код более подробно.
Kotlin
import android.content.Intentimport androidx.appcompat.app.AppCompatActivityimport android.os.Bundleimport android.util.Logimport android.widget.Buttonimport android.widget.EditTextimport android.widget.Toastimport com.google.firebase.FirebaseExceptionimport com.google.firebase.auth.FirebaseAuthimport com.google.firebase.auth.PhoneAuthCredentialimport com.google.firebase.auth.PhoneAuthOptionsimport com.google.firebase.auth.PhoneAuthProviderimport java.util.concurrent.TimeUnitclass PhoneNumberActivity : AppCompatActivity() { // this stores the phone number of the user var number : String ="" // create instance of firebase auth lateinit var auth: FirebaseAuth // we will use this to match the sent otp from firebase lateinit var storedVerificationId:String lateinit var resendToken: PhoneAuthProvider.ForceResendingToken private lateinit var callbacks: PhoneAuthProvider.OnVerificationStateChangedCallbacks override fun onCreate(savedInstanceState: Bundle?) { super.onCreate(savedInstanceState) setContentView(R.layout.activity_phone_number) auth=FirebaseAuth.getInstance() // start verification on click of the button findViewById<Button>(R.id.button_otp).setOnClickListener { login() } // Callback function for Phone Auth callbacks = object : PhoneAuthProvider.OnVerificationStateChangedCallbacks() { // This method is called when the verification is completed override fun onVerificationCompleted(credential: PhoneAuthCredential) { startActivity(Intent(applicationContext, MainActivity::class.java)) finish() Log.d("GFG" , "onVerificationCompleted Success") } // Called when verification is failed add log statement to see the exception override fun onVerificationFailed(e: FirebaseException) { Log.d("GFG" , "onVerificationFailed $e") } // On code is sent by the firebase this method is called // in here we start a new activity where user can enter the OTP override fun onCodeSent( verificationId: String, token: PhoneAuthProvider.ForceResendingToken ) { Log.d("GFG","onCodeSent: $verificationId") storedVerificationId = verificationId resendToken = token // Start a new activity using intent // also send the storedVerificationId using intent // we will use this id to send the otp back to firebase val intent = Intent(applicationContext,OtpActivity::class.java) intent.putExtra("storedVerificationId",storedVerificationId) startActivity(intent) finish() } } } private fun login() { number = findViewById<EditText>(R.id.et_phone_number).text.trim().toString() // get the phone number from edit text and append the country cde with it if (number.isNotEmpty()){ number = "+91$number" sendVerificationCode(number) }else{ Toast.makeText(this,"Enter mobile number", Toast.LENGTH_SHORT).show() } } // this method sends the verification code // and starts the callback of verification // which is implemented above in onCreate private fun sendVerificationCode(number: String) { val options = PhoneAuthOptions.newBuilder(auth) .setPhoneNumber(number) // Phone number to verify .setTimeout(60L, TimeUnit.SECONDS) // Timeout and unit .setActivity(this) // Activity (for callback binding) .setCallbacks(callbacks) // OnVerificationStateChangedCallbacks .build() PhoneAuthProvider.verifyPhoneNumber(options) Log.d("GFG" , "Auth started") }} |
Шаг 7: Работа с файлом OtpActivity.kt
Перейдите к файлу OtpActivity.kt и обратитесь к следующему коду. Ниже приведен код файла OtpActivity.kt . Комментарии добавляются внутри кода, чтобы понять код более подробно.
Kotlin
import android.content.Intentimport androidx.appcompat.app.AppCompatActivityimport android.os.Bundleimport android.widget.Buttonimport android.widget.EditTextimport android.widget.Toastimport com.google.firebase.auth.FirebaseAuthimport com.google.firebase.auth.FirebaseAuthInvalidCredentialsExceptionimport com.google.firebase.auth.PhoneAuthCredentialimport com.google.firebase.auth.PhoneAuthProviderclass OtpActivity : AppCompatActivity() { // get reference of the firebase auth lateinit var auth: FirebaseAuth override fun onCreate(savedInstanceState: Bundle?) { super.onCreate(savedInstanceState) setContentView(R.layout.activity_otp) auth=FirebaseAuth.getInstance() // get storedVerificationId from the intent val storedVerificationId= intent.getStringExtra("storedVerificationId") // fill otp and call the on click on button findViewById<Button>(R.id.login).setOnClickListener { val otp = findViewById<EditText>(R.id.et_otp).text.trim().toString() if(otp.isNotEmpty()){ val credential : PhoneAuthCredential = PhoneAuthProvider.getCredential( storedVerificationId.toString(), otp) signInWithPhoneAuthCredential(credential) }else{ Toast.makeText(this,"Enter OTP", Toast.LENGTH_SHORT).show() } } } // verifies if the code matches sent by firebase // if success start the new activity in our case it is main Activity private fun signInWithPhoneAuthCredential(credential: PhoneAuthCredential) { auth.signInWithCredential(credential) .addOnCompleteListener(this) { task -> if (task.isSuccessful) { val intent = Intent(this , MainActivity::class.java) startActivity(intent) finish() } else { // Sign in failed, display a message and update the UI if (task.exception is FirebaseAuthInvalidCredentialsException) { // The verification code entered was invalidРЕКОМЕНДУЕМЫЕ СТАТЬИ |