Как создать элементы управления формы для мобильных устройств с помощью плагина jQuery Mobile BootstrapTheme?
Цель этой статьи - представить некоторые формы или элементы управления пользовательским вводом для мобильных веб-дизайнеров, использующих плагин jQuery Mobile Bootstrap Theme. Эти элементы управления пользовательского интерфейса на основе CSS очень привлекательны и интерактивны и помогают разработчикам создавать красивые приложения.
Чтобы разработать и реализовать плагин, загрузите необходимые предварительно скомпилированные файлы или библиотеки по ссылке и сохраните их в своей рабочей папке. При кодировании следует позаботиться об именах путей к файлам.
Примечание. Включите раздел «заголовок» во все следующие коды, как это реализовано в первом примере для включения соответствующей библиотеки для плагина, как показано выше.
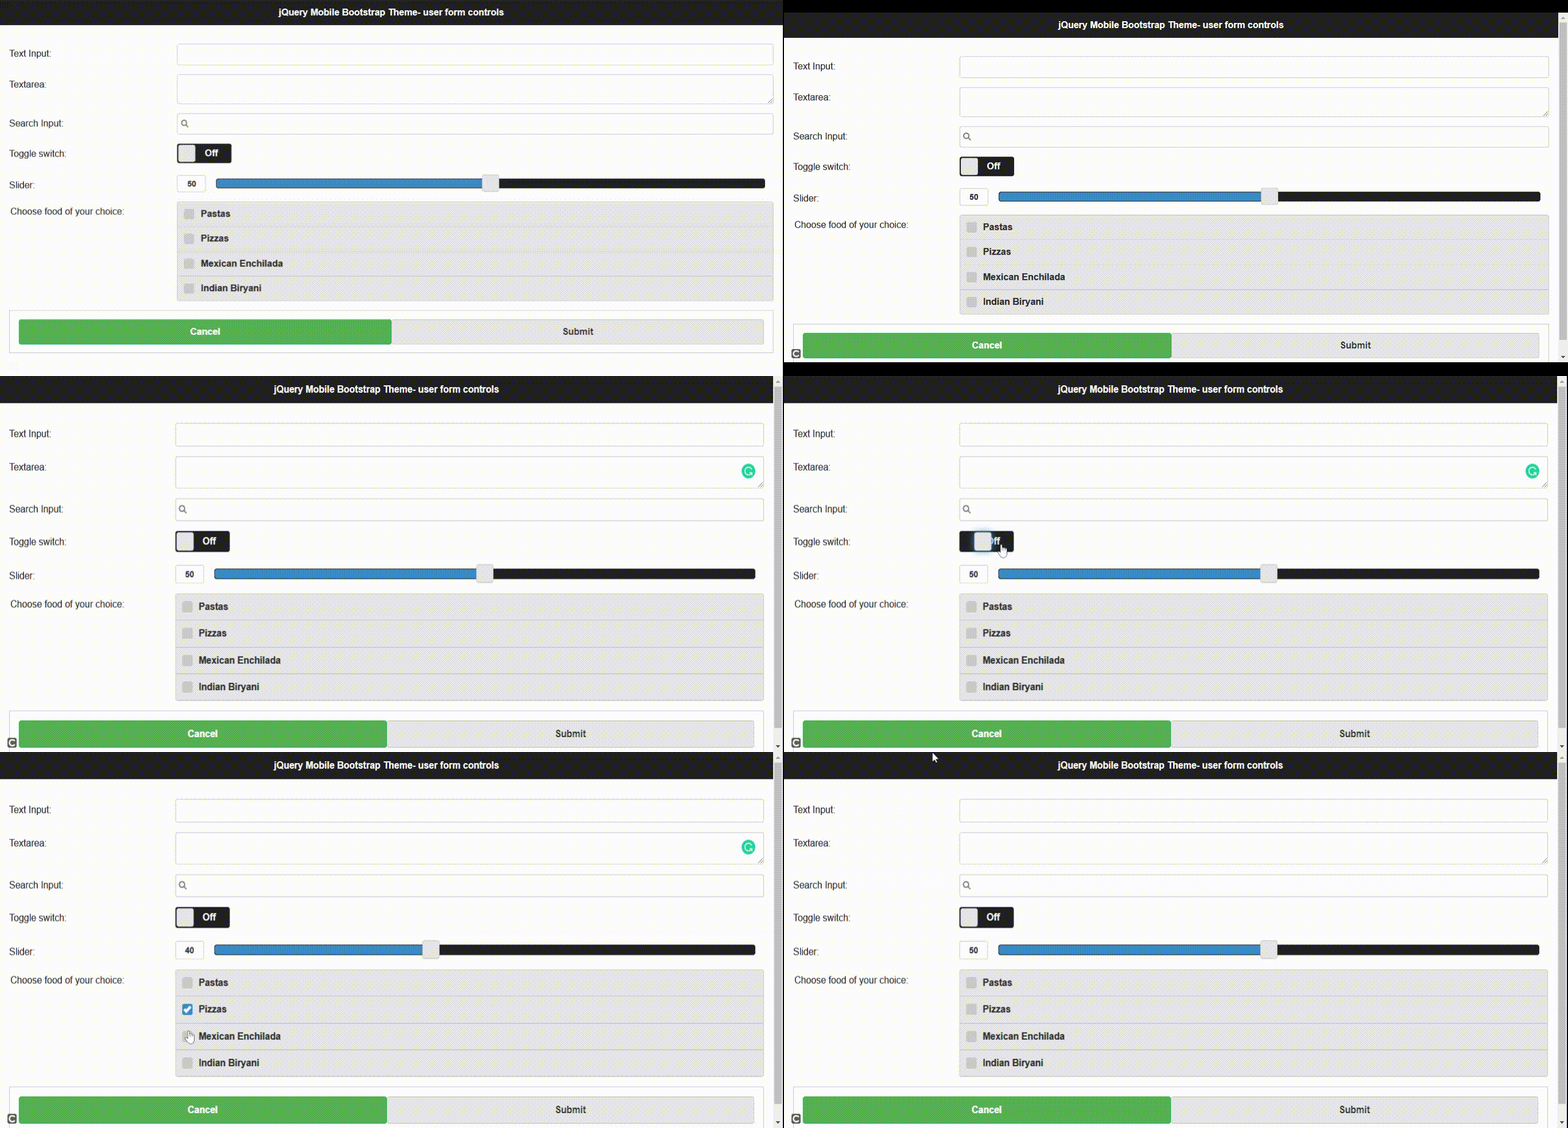
Пример 1. Следующий код демонстрирует некоторые элементы управления формой пользовательского интерфейса, использующие определенные классы вышеупомянутого подключаемого модуля. Обратитесь к выходным изображениям, чтобы лучше узнать элементы управления.
HTML
<!doctype html>< html > < head > < meta charset = "utf-8" > < meta name = "viewport" content = "width=device-width,initial-scale=1" > <!--The plugin CSS library --> < link rel = "stylesheet" href = "themes/Bootstrap.css" > < link rel = "stylesheet" < link rel = "stylesheet" href = "themes/jquery.mobile.icons.min.css" /> < script </ script > <!--Pre-compiled library for jQuery Mobile--> < script </ script ></ head > < body > < div data-role = "page" data-theme = "a" > < div data-role = "header" data-position = "inline" > < h1 > jQuery Mobile Bootstrap Theme - user form controls </ h1 > </ div > < div data-role = "content" data-theme = "a" > < form action = "#" method = "get" > <!--Text input control --> < div data-role = "fieldcontain" > < label for = "name" >Text Input:</ label > < input type = "text" name = "name" id = "name" value = "" /> </ div > <!--Text area control --> < div data-role = "fieldcontain" > < label for = "textarea" >Textarea:</ label > < textarea cols = "40" rows = "8" name = "textarea" id = "textarea" > </ textarea > </ div > <!--Search input control --> < div data-role = "fieldcontain" > < label for = "search" >Search Input:</ label > < input type = "search" name = "password" id = "search" value = "" /> </ div > <!--Switch on/off control --> < div data-role = "fieldcontain" > < label for = "slider2" >Toggle switch:</ label > < select name = "slider2" id = "slider2" data-role = "slider" > < option value = "off" >Off</ option > < option value = "on" >On</ option > </ select > </ div > <!--Slider --> < div data-role = "fieldcontain" > < label for = "slider" >Slider:</ label > < input type = "range" name = "slider" id = "slider" value = "50" min = "0" max = "100" data-highlight = "true" /> </ div > <!--Check box control --> < div data-role = "fieldcontain" > < fieldset data-role = "controlgroup" > < legend >Choose food of your choice:</ legend > < input type = "checkbox" name = "checkbox-1a" id = "checkbox-1a" class = "custom" /> < label for = "checkbox-1a" >Pastas</ label > < input type = "checkbox" name = "checkbox-2a" id = "checkbox-2a" class = "custom" /> < label for = "checkbox-2a" >Pizzas</ label > < input type = "checkbox" name = "checkbox-3a" id = "checkbox-3a" class = "custom" /> < label for = "checkbox-3a" >Mexican Enchilada</ label > < input type = "checkbox" name = "checkbox-4a" id = "checkbox-4a" class = "custom" /> < label for = "checkbox-4a" >Indian Biryani</ label > </ fieldset > </ div > <!--Submit buttons --> < div class = "ui-body ui-body-b" > < fieldset class = "ui-grid-a" > < div class = "ui-block-a" > < button type = "submit" data-theme = "d" > Cancel </ button > </ div > < div class = "ui-block-b" > < button type = "submit" data-theme = "a" > Submit </ button > </ div > </ fieldset > </ div > </ form > </ div > </ div ></ body > </ html > |
Выход:

Пример 2:
html
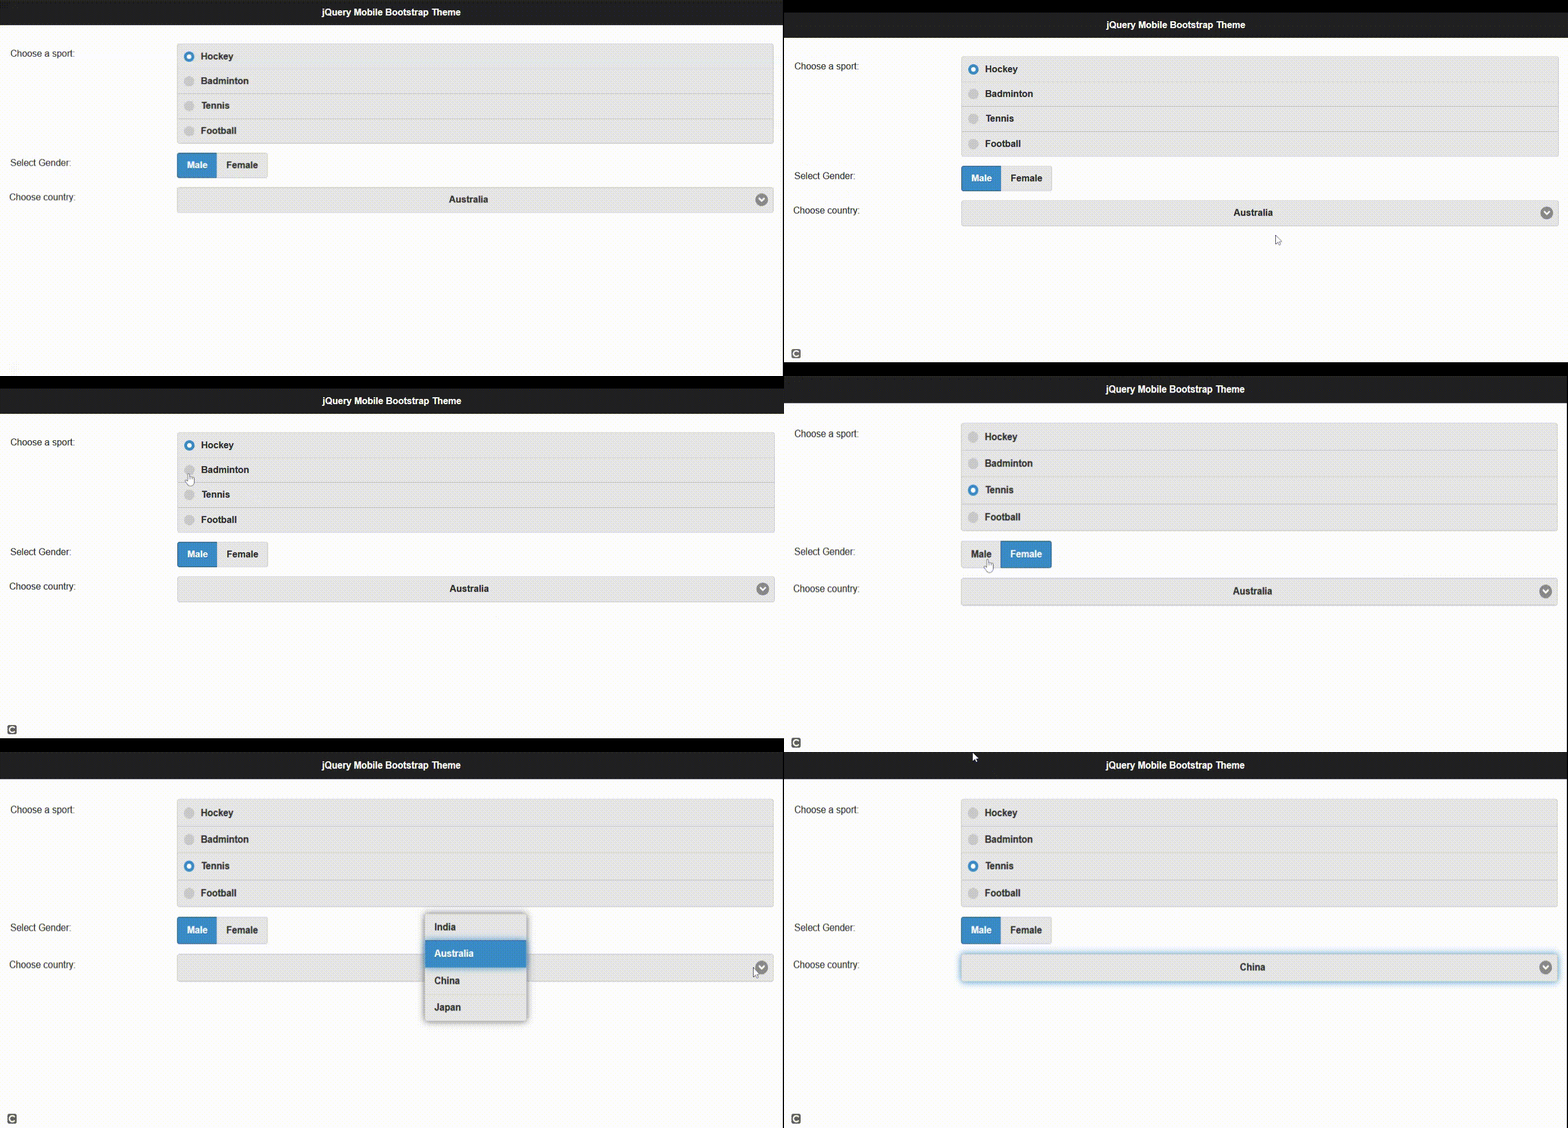
<!doctype html>< html >< body > < div data-role = "page" data-theme = "a" > < div data-role = "header" data-position = "inline" > < h1 >jQuery Mobile Bootstrap Theme</ h1 > </ div > < div data-role = "content" data-theme = "a" > < form action = "#" method = "get" > < div data-role = "fieldcontain" > < fieldset data-role = "controlgroup" > < legend >Choose a sport:</ legend > < input type = "radio" name = "radio-choice-1" id = "radio-choice-1" value = "choice-1" checked = "checked" /> < label for = "radio-choice-1" >Hockey</ label > < input type = "radio" name = "radio-choice-1" id = "radio-choice-2" value = "choice-2" /> < label for = "radio-choice-2" >Badminton</ label > < input type = "radio" name = "radio-choice-1" id = "radio-choice-3" value = "choice-3" /> < label for = "radio-choice-3" >Tennis</ label > < input type = "radio" name = "radio-choice-1" id = "radio-choice-4" value = "choice-4" /> < label for = "radio-choice-4" >Football</ label > </ fieldset > </ div > < div data-role = "fieldcontain" > < fieldset data-role = "controlgroup" data-type = "horizontal" > < legend >Select Gender:</ legend > < input type = "radio" name = "radio-choice-b" id = "radio1" value = "on" checked = "checked" /> < label for = "radio1" >Male</ label > < input type = "radio" name = "radio-choice-b" id = "radio2" value = "off" /> < label for = "radio2" >Female</ label > </ fieldset > </ div > < div data-role = "fieldcontain" > < label for = "select-choice-a" class = "select" > Choose country:</ label > < select name = "select-choice-a" id = "select-choice-a" data-native-menu = "false" > < option value = "india" >India</ option > < option value = "australia" >Australia</ option > < option value = "china" >China</ option > < option value = "japan" >Japan</ option > </ select > </ div > </ form > </ div > </ div > </ body ></ html > |
Выход:

Пример 3: В следующем коде показаны некоторые кнопки для дизайна мобильного пользовательского интерфейса.
html
< html >< body > < div data-role = "page" data-theme = "a" > < div data-role = "header" data-position = "inline" > < h1 >jQuery Mobile Bootstrap Theme Buttons</ h1 > </ div > < div data-role = "content" data-theme = "a" > <!-- "yourFile.html" is the target file --> < a href = "yourfile.html" data-role = "button" data-theme = "a" data-icon = "star" >Star button</ a > < a href = "" data-role = "button" data-theme = "b" data-icon = "search" >Search</ a > < a href = "" data-role = "button" data-theme = "c" data-icon = "check" > Check</ a > < a href = "" data-role = "button" data-theme = "d" data-icon = "info" > Info</ a > < a href = "" data-role = "button" data-theme = "e" data-icon = "arrow-d" > Download</ a > < a href = "" data-role = "button" data-theme = "f" data-icon = "delete" > Delete</ a > </ div > </ div > </ body ></ html > |
Выход:

Пример 4: В следующем коде показаны некоторые списки для мобильного дизайна.
html
< html >< head > < meta charset = "utf-8" > < meta name = "viewport" content = "width=device-width,initial-scale=1" > <!--The plugin CSS library --> < link rel = "stylesheet" href = "themes/Bootstrap.css" > < link rel = "stylesheet" < link rel = "stylesheet" href = "themes/jquery.mobile.icons.min.css" /> < script </ script > <!--Pre-compiled library for jQuery Mobile--> < script </ script ></ head > < body > < div data-role = "page" data-theme = "a" > < div data-role = "header" data-position = "inline" > < h1 >jQuery Mobile Bootstrap Theme Listviews</ h1 > </ div > < div data-role = "content" data-theme = "a" > < ul data-role = "listview" data-inset = "true" data-divider-theme = "a" > < li data-role = "list-divider" >Gear list item</ li > < li data-icon = "gear" >< a href = "" >list item 1</ a ></ li >РЕКОМЕНДУЕМЫЕ СТАТЬИ |