Как подключить MongoDB к Spring Boot?
В последнее время MongoDB является наиболее используемой базой данных в индустрии программного обеспечения. Ее легко использовать и осваивать. Эта база данных стоит на вершине баз данных документов, она обеспечивает масштабируемость и гибкость, которые вам нужны, с запросами и индексированием, которые вам нужны. В этом мы объясним, как мы подключаем MongoDB к Spring Boot. Перед запуском это программное обеспечение должно быть установлено в вашей системе.
- Ява
- Любая IDE с поддержкой Spring Boot, например: STS (Spring Tool Suite), IntelliJ IDE и т. д.
- MongoDB
Добавьте эти зависимости в файл pom.xml в файле dependencies.
XML
<dependency> <groupId>org.springframework.boot</groupId> <artifactId>spring-boot-starter-data-mongodb</artifactId></dependency><dependency> <groupId>org.springframework.boot</groupId> <artifactId>spring-boot-starter-web</artifactId></dependency> |
Свойства подключения MongoDB:
Есть важный параметр, который нам нужно знать, чтобы подключить сервер MongoDB к Spring Boot.
- Порт (по умолчанию порт — 27017)
- Хост (по умолчанию хост — localhost)
- Имя базы данных
- Учетные данные (необязательно)
Эти параметры нам нужно задать в свойствах приложения.
spring.data.mongodb.host=localhost
spring.data.mongodb.port=27017
spring.data.mongodb.database=demo
spring.data.mongodb.username=username_value  (optional)
spring.data.mongodb.password=password_value (optional)
или же,
spring.data.mongodb.uri=mongodb://your_username:your_password@localhost:27017/demo
Note:
- demo (Database Name)
- By default, you can use like this (if there is no username and password set in your MongoDB) => “spring.data.mongodb.uri=mongodb://localhost:27017/demo”
- By default, we do not need a user and password.
Пример проекта
Например, мы используем IDE STS (Spring Tool Suite), и мы создали новый проект и добавили эти Spring Data MongoDB и веб-зависимости Spring в наш проект.
Шаг 1: Мы создадим класс «Пользователь», вы можете создать класс с любым именем, определить любую переменную и аннотировать с помощью «@document», вы можете обратиться к изображению ниже для лучшего понимания, имейте в виду, что ваш класс будет именем вашего документа (Имя таблицы), а переменная будет именем столбца, когда она будет создана в вашей базе данных.
Java
import org.springframework.data.annotation.Id;import org.springframework.data.mongodb.core.mapping.Document; @Documentpublic class User { @Id private String userId; private String name; private String rollNumber; public User(String name, String rollNumber) { super(); this.name = name; this.rollNumber = rollNumber; } public String getUserId() { return userId; } public String getName() { return name; } public void setName(String name) { this.name = name; } public String getRollNumber() { return rollNumber; } public void setRollNumber(String rollNumber) { this.rollNumber = rollNumber; }} |
Шаг 2: Мы создадим интерфейс , который расширит MongoRepository, с помощью этого интерфейса мы выполним операцию CRUD (создание, чтение, обновление, удаление) в нашей базе данных.
Note:
- Please keep in mind if you want to create one or more document (Table) for that every document (Table) you need to define a new interface that will extend MongoRepository.
- MongoRepository<User,String> here “User” is my class name and “String” is my ID data type that we already defined in the User class and annotated with “@Id”.
Java
import org.springframework.data.mongodb.repository.MongoRepository; public interface UserRepository extends MongoRepository<User,String>{ } |
Шаг 3: Мы определим важные параметры подключения к серверу MongoDB.
Note: # means that line of code is commented.
XML
#spring.data.mongodb.host=localhost#spring.data.mongodb.port=27017#spring.data.mongodb.database=userDatabaseserver.port=8081spring.data.mongodb.uri=mongodb://localhost:27017/userDatabase |
Шаг 4: Теперь это последний шаг на этом шаге, мы создадим класс контроллера, оттуда мы выполним операцию CRUD в нашей базе данных.
- Мы аннотируем класс контроллера @RestController.
- Мы создаем объект нашего репозитория и аннотируем его @Autowired.
Java
import java.util.List; import org.springframework.beans.factory.annotation.Autowired;import org.springframework.web.bind.annotation.GetMapping;import org.springframework.web.bind.annotation.PostMapping;import org.springframework.web.bind.annotation.RequestBody;import org.springframework.web.bind.annotation.RestController; @RestControllerpublic class UserController { @Autowired private UserRepository userRepo; // Save method is predefine method in Mongo Repository // with this method we will save user in our database @PostMapping("/addUser") public User addUser(@RequestBody User user) { return userRepo.save(user); } // findAll method is predefine method in Mongo Repository // with this method we will all user that is save in our database @GetMapping("/getAllUser") public List<User> getAllUser(){ return userRepo.findAll(); }} |
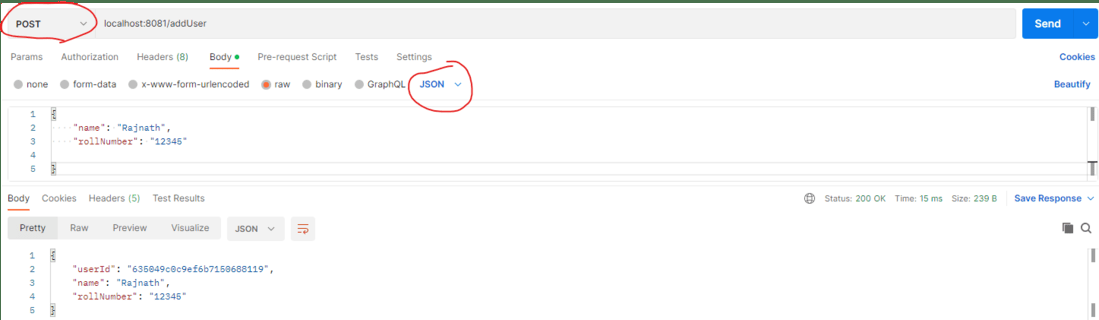
Для проверки, работает ли он нормально или нет, мы используем Postman.
Note:
- We do not need to insert the user Id MongoDB automatically will create a unique id and insert it into our data.”
- These “name” and “rollNumber” must be the same as your column name or you can say the same as the User Class variable name otherwise the value will not insert in your database by default null value will store in the database.
Выход: