Как добавить фильтр в галерею портфолио с использованием HTML, CSS и JavaScript?
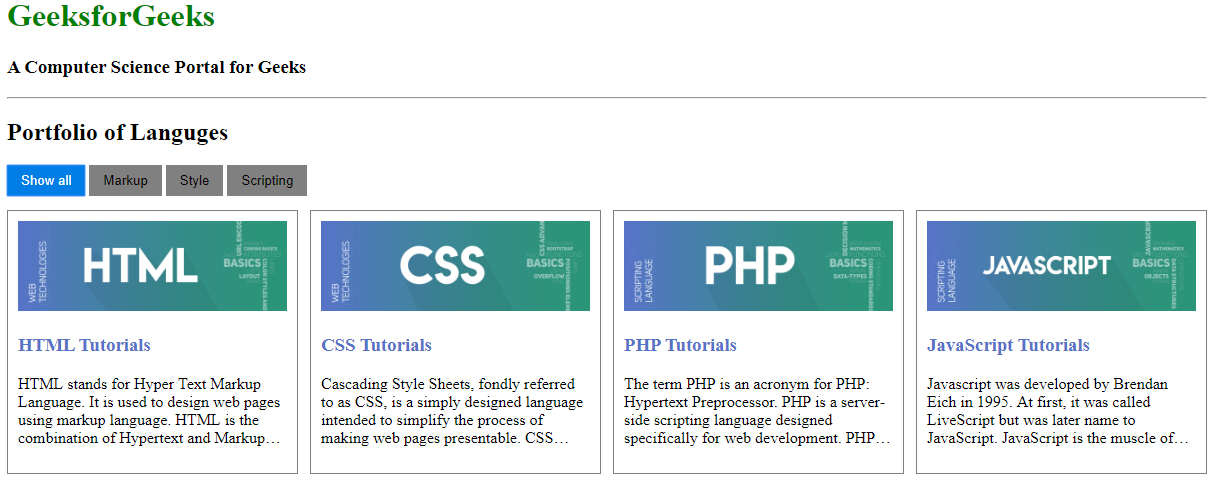
Галерея портфолио полезна, когда ваш веб-сайт содержит различные типы контента или очень много контента. С помощью галереи портфолио вы можете легко отобразить пользователю все содержимое своей главной страницы. Но если пользователю нужно какое-то конкретное содержимое, нам нужно прикрепить фильтры к портфолио. В этой статье мы добавим фильтры с помощью JavaScript. Прежде чем перейти к этой статье, вы можете прочитать статью «Как создать галерею портфолио с помощью HTML и CSS?».
Создание структуры: в этом разделе мы создадим базовую структуру веб-сайта портфолио. Здесь мы прикрепим атрибут title, чтобы пользователь мог знать, каким будет тип контента для каждой ленты портфолио.
- HTML-код: В этом разделе мы разработаем базовую структуру галереи портфолио.
html
<!DOCTYPE html><html><head><metaname="viewport"content="width=device-width, initial-scale=1"></head><body><!-- Title and tag --><divclass="container"><h1>GeeksforGeeks</h1><h3>A Computer Science Portal for Geeks</h3><hr><!-- Content of the body--><h2>Portfolio of Languages</h2><!-- Button foreach group --><divid="filtering"><buttonclass="bttn active"onclick="geeksportal('all')">Show all</button><buttonclass="bttn"onclick="geeksportal('Markup')">Markup</button><buttonclass="bttn"onclick="geeksportal('Style')">Style</button><buttonclass="bttn"onclick="geeksportal('Scripting')">Scripting</button></div><!-- Portfolio Gallery Grid --><divclass="row"><divclass="column Markup"><divclass="content"><imgsrc=alt="HTML"style="width:100%"><h3><ahref="#">HTML Tutorials</a></h3><p>HTML stands for Hyper Text MarkupLanguage. It is used to design webpages using markup language. HTMLis the combination of Hypertextand Markup language. Hypertextdefines the link between the webpages.</p></div></div><divclass="column Styleshit"><divclass="content"><imgsrc=alt="CSS"style="width:100%"><h3><ahref="#">CSS Tutorials</a></h3><p>Cascading Style Sheets, fondlyreferred to as CSS, is a simplydesigned language intended tosimplify the process of makingweb pages presentable. CSS allowsyou to apply styles to web pages.</p></div></div><divclass="column Scripting"><divclass="content"><imgsrc=alt=""style="width:100%"><h3><ahref="#">PHP Tutorials</a></h3><p>The term PHP is an acronym for PHP:Hypertext Preprocessor. PHP is aserver-side scripting languagedesigned specifically for webdevelopment. PHP can be easilyembedded in HTML files.</p></div></div><divclass="column Scripting"><divclass="content"><imgsrc=alt=""style="width:100%"><h3><ahref="#">JavaScript Tutorials</a></h3><p>Javascript was developed by BrendanEich in 1995. At first, it was calledLiveScript but was later name toJavaScript. JavaScript is the muscleof the structure</p></div></div></div></div></body></html>
Разработка структуры: в предыдущем разделе мы создали структуру базового веб-сайта, а теперь мы собираемся использовать CSS для разработки структуры веб-страницы.
- Код CSS:
CSS
<style>/* Wildcard styling */* {box-sizing: border-box;}/* Padding for whole body */body {padding:15px;}.container {max-width:1200px;margin:auto;}/* Styling h2 tag */h1{Color:green;word-break: break-all;}/* Anchor tag decoration */a {text-decoration:none;color:#5673C8;}a:hover {color: lightblue;}.row {margin:0px-14px;padding:8px;}.row > .column {padding:6px;}.column {float:left;width:25%;display:none;}/* Content decoration */.content {background-color:white;padding:10px;border:1pxsolidgray;}/* Paragraph decoration */p {display: -webkit-box;-webkit-box-orient: vertical;-webkit-line-clamp:4;overflow:hidden;}.row:after {content:"";display: table;clear:both;}.content {background-color:white;padding:10px;border:1pxsolidgray;}.show{display:block;}/* Style the filter buttons */.bttn {border:none;padding:8px14px;background-color:gray;}.bttn:hover {background-color:#007EE5;opacity:0.8;}.bttn.active {background-color:#007EE5;color:white;}/* Window size 850 width set */@mediascreenand (max-width:850px) {.column {width:50%;}}/* Window size 400 width set */@mediascreenand (max-width:400px) {.column {width:100%;}}</style> - Код JavaScript:
javascript
<script>geeksportal("all")functiongeeksportal(c) {varx, i;x = document.getElementsByClassName("column");if(c =="all") c ="";for(i = 0; i < x.length; i++) {w3RemoveClass(x[i],"show");if(x[i].className.indexOf(c) > -1)w3AddClass(x[i],"show");}}functionw3AddClass(element, name) {vari, arr1, arr2;arr1 = element.className.split(" ");arr2 = name.split(" ");for(i = 0; i < arr2.length; i++) {if(arr1.indexOf(arr2[i]) == -1) {element.className +=" "+ arr2[i];}}}functionw3RemoveClass(element, name) {vari, arr1, arr2;arr1 = element.className.split(" ");arr2 = name.split(" ");for(i = 0; i < arr2.length; i++) {while(arr1.indexOf(arr2[i]) > -1) {arr1.splice(arr1.indexOf(arr2[i]), 1);}}element.className = arr1.join(" ");}// Add active class to the current// button (highlight it)varbtnContainer = document.getElementById("filtering");varbtns = btnContainer.getElementsByClassName("bttn");for(vari = 0; i < btns.length; i++) {btns[i].addEventListener("click",function() {varcurrent =document.getElementsByClassName("active");current[0].className =current[0].className.replace(" active","");this.className +=" active";});}</script>
Объединение кода HTML, CSS и JavaScript: объединение кода раздела HTML, CSS и JavaScript для создания полной галереи портфолио с фильтром.
html
<!DOCTYPE html>< html > < head > < meta name = "viewport" content = "width=device-width, initial-scale=1" > < style > /* Wildcard styling */ * { box-sizing: border-box; } /* Padding for whole body */ body { padding: 15px; } .container { max-width: 1200px; margin: auto; } /* Styling h2 tag */ h1 { Color: green; word-break: break-all; } /* Anchor tag decoration */ a { text-decoration: none; color: #5673C8; } a:hover { color: lightblue; } .row { margin: 0px -14px; padding: 8px; } .row > .column { padding: 6px; } .column { float: left; width: 25%; display: none; } /* Content decoration */ .content { background-color: white; padding: 10px; border: 1px solid gray; } /* Paragraph decoration */ p { display: -webkit-box; -webkit-box-orient: vertical; -webkit-line-clamp: 4; overflow: hidden; } .row:after { content: ""; display: table; clear: both; } .content { background-color: white; padding: 10px; border: 1px solid gray; } .show { display: block; } /* Style the filter buttons */ .bttn { border: none; padding: 8px 14px; background-
РЕКОМЕНДУЕМЫЕ СТАТЬИ |