Создайте липкую панель социальных сетей с помощью HTML и CSS
Для создания липкой панели социальных сетей на любом веб-сайте используются HTML и CSS . Если вы хотите прикрепить значки к липким социальным сетям, вам понадобится ссылка на CDN с отличным шрифтом. В наши дни социальные сети - лучшая платформа для рекламы ваших вещей. Социальные сети, где вы можете легко проинформировать клиента или пользователя о своем продукте, пользователь может поделиться деталями продукта в своей учетной записи в социальных сетях, если им нравится ваш продукт. Поэтому создание липкой панели социальных сетей иногда замедляет работу вашего сайта (если вы используете плагины jQuery для липкой панели социальных сетей). В этой статье вы узнаете, как прикрепить липкую панель социальных сетей к своему сайту. Эта статья разделена на два раздела « Создание структуры» и « Разработка структуры» .
Полное представление о липкой панели социальных сетей: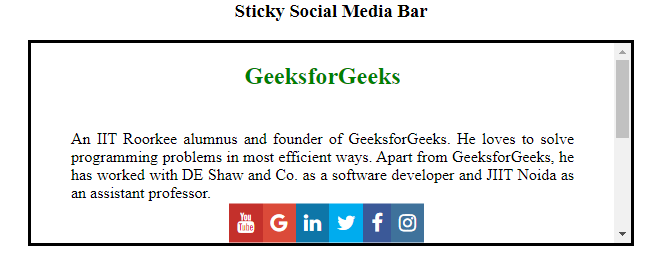
Создание структуры: в этом разделе мы создадим базовую структуру сайта, а также прикрепим ссылку CDN Font-Awesome для значков, которые будут использоваться в качестве липкой панели социальных сетей.
- Ссылки CDN для иконок из Font Awesome:
<link rel=”stylesheet” href=”https://cdnjs.cloudflare.com/ajax/libs/font-awesome/4.7.0/css/font-awesome.min.css”>
- HTML-код для создания структуры:
<!DOCTYPE html><html><head><title>Sticky Social Media Bar</title></head><body><center><h3>Sticky Social Media Bar</h3><!-- Icons for the sticky Social Bar --><divclass="body-part"><divclass="icon-list"><ahref="#instagram"class="instagram"><iclass="fa fa-instagram"></i></a><ahref="#facebook"class="facebook"><iclass="fa fa-facebook"></i></a><ahref="#twitter"class="twitter"><iclass="fa fa-twitter"></i></a><ahref="#linkedin"class="linkedin"э"linkedin"><iclass="fa fa-linkedin"></i></a><ahref="#google"class="google"><iclass="fa fa-google"></i></a><ahref="#youtube"class="youtube"><iclass="fa fa-youtube"></i></a></div><!-- Content of the Page --><h2>GeeksforGeeks</h2><p>An IIT Roorkee alumnus and founder of GeeksforGeeks.He loves to solve programming problems in mostefficient ways. Apart from GeeksforGeeks, he hasworked with DE Shaw and Co. as a software developerand JIIT Noida as an assistant professor.</p><p>Only the zeal to learn and improve yourself is allwe need. Anyone who has a passion for learning andwriting is welcome to write for us. Contributionon GeeksforGeeks is not limited to writing articlesonly, below are the details about the ways in whichyou can help us and other fellow programmers:</p><p>If you like GeeksforGeeks and would like tocontribute, you can also write an article usingcontribute.geeksforgeeks.org or mail your articleto contribute@geeksforgeeks.org. See your articleappearing on the GeeksforGeeks main page and helpother Geeks.</p></div></center></body></html>
Разработка структуры: в предыдущем разделе мы создали структуру базового веб-сайта, на котором мы собираемся использовать липкие панели социальных сетей. В этом разделе мы разработаем структуру и прикрепим липкие значки панели социальных сетей.
- Код CSS, чтобы хорошо выглядела структура:
<style>/* Styling Body-part */.body-part {width: 600px;height: 200px;border: 3px solid black;overflow: auto;}h2 {color: green;}/* Justifying Content text */p {text-align: justify;margin: 40px;}/* Styling icons */.icon-list {position: fixed;top: 242px;right:40%;transform: translateY(-50%);}.icon-list a {display: block;text-align: center;padding: 8px;transition: all 0.5s ease;color: white;font-size: 20px;float:right;}/* HOver affect on icons */.icon-list a:hover {color: #000;width:50px;}/* Desingning each icons */.instagram {background: #3f729b;color: white;}.facebook {background: #3b5998;color: white;}.twitter {background: #00acee;color: white;}.linkedin {background: #0e76a8;color: white;}.google {background: #db4a39;color: white;}.youtube {background: #c4302b;color: white;}</style>
Объедините код HTML и CSS: это последний код после объединения двух вышеупомянутых разделов. Это создаст липкую панель в социальных сетях на веб-сайте.
<!DOCTYPE html>< html > < head > < title >Sticky Social Media Bar</ title > <!-- Linking Font-Awesome For the Icons --> < link rel = "stylesheet" href = < style > /* Styling Body-part */ .body-part { width: 600px; height: 200px; border: 3px solid black; overflow: auto; } h2 { color: green; } /* Justifying Content text */ p { text-align: justify; margin: 40px; } /* Styling icons */ .icon-list { position: fixed; top: 242px; right:40%; transform: translateY(-50%); } .icon-list a { display: block; text-align: center; padding: 8px; transition: all 0.5s ease; color: white; font-size: 20px; float:right; } /* HOver affect on icons */ .icon-list a:hover { color: #000; width:50px; } /* Desingning each icons */ .instagram { background: #3f729b; color: white; } .facebook { background: #3b5998; color: white; } .twitter { background: #00acee; color: white; } .linkedin { background: #0e76a8; color: white; } .google { background: #db4a39; color: white; } .youtube { background: #c4302b; color: white; } </ style ></ head > < body > < center > < h3 >Sticky Social Media Bar</ h3 > <!-- Icons for the sticky Social Bar --> < div class = "body-part" > < div class = "icon-list" > < a href = "#instagram" class = "instagram" > < i class = "fa fa-instagram" ></ i > </ a > < a href = "#facebook" class = "facebook" > < i class = "fa fa-facebook" ></ i > </ a > < a href = "#twitter" class = "twitter" > < i class = "fa fa-twitter" ></ i > </ a > < a href = "#linkedin" class = "linkedin" э "linkedin" > < i class = "fa fa-linkedin" ></ i > </ a > < a href = "#google" class = "google" > < i class = "fa fa-google" ></ i > </ a > < a href = "#youtube" class = "youtube" > < i class = "fa fa-youtube" ></ i > </ a > </ div > <!-- Content of the Page --> < h2 >GeeksforGeeks</ h2 > < p > An IIT Roorkee alumnus and founder of GeeksforGeeks. He loves to solve programming problems in most efficient ways. Apart from GeeksforGeeks, he has worked with DE Shaw and Co. as a software developer and JIIT Noida as an assistant professor. </ p > < p > Only the zeal to learn and improve yourself is all we need. Anyone who has a passion for learning and writing is welcome to write for us. Contribution on GeeksforGeeks is not limited to writing articles only, below are the details about the ways in which you can help us and other fellow programmers: </ p > < p > If you like GeeksforGeeks and would like to contribute, you can also write an article using contribute.geeksforgeeks.org or mail your article to contribute@geeksforgeeks.org. See your article appearing on the GeeksforGeeks main page and help other Geeks. </ p > </ div > </ center ></ body > </ html > |
Выход: 