Python | Введение в веб-разработку с использованием Flask
Что такое Flask?
Flask - это API Python, который позволяет нам создавать веб-приложения. Его разработал Армин Ронахер. Фреймворк Flask более явный, чем фреймворк Django, и его легче изучить, потому что он имеет меньше базового кода для реализации простого веб-приложения. Платформа веб-приложений или веб-платформа - это набор модулей и библиотек, которые помогают разработчику писать приложения без написания низкоуровневых кодов, таких как протоколы, управление потоками и т. Д. Flask основан на наборе инструментов WSGI (интерфейс шлюза веб-сервера). и шаблонизатор Jinja2.
Getting Started With Flask:
Python 2.6 or higher is required for the installation of the Flask. You can start by import Flask from the flask package on any python IDE. For installation on any environment, you can click on the installation link given below.
To test that if the installation is working, check out this code given below.
# an object of WSGI applicationfrom flask import Flask app = Flask(__name__) # Flask constructor # A decorator used to tell the application# which URL is associated function@app.route("/") def hello(): return "HELLO" if __name__=="__main__": app.run() |
‘/’ URL is bound with hello() function. When the home page of the webserver is opened in the browser, the output of this function will be rendered accordingly.
The Flask application is started by calling the run() function. The method should be restarted manually for any change in the code. To overcome this, the debug support is enabled so as to track any error.
app.debug = Trueapp.run()app.run(debug = True) |
Routing:
Nowadays, the web frameworks provide routing technique so that user can remember the URLs. It is useful to access the web page directly without navigating from the Home page. It is done through the following route() decorator, to bind the URL to a function.
# decorator to route URL@app.route(‘/hello’) # binding to the function of route def hello_world(): return ‘hello world’ |
If a user visits http://localhost:5000/hello URL, the output of the hello_world() function will be rendered in the browser. The add_url_rule() function of an application object can also be used to bind URL with the function as in above example.
def hello_world(): return ‘hello world’app.add_url_rule(‘/’, ‘hello’, hello_world) |
Using Variables in Flask:
The Variables in the flask is used to build a URL dynamically by adding the variable parts to the rule parameter. This variable part is marked as. It is passed as keyword argument. See the example below
from flask import Flaskapp = Flask(__name__) # routing the decorator function hello_name@app.route("/hello/<name>") def hello_name(name): return "Hello %s!" % name if __name__ == "__main__": app.run(debug = True) |
Сохраните приведенный выше пример как hello.py и запустите из командной оболочки. Затем откройте браузер и введите URL-адрес http: // localhost: 5000 / hello / GeeksforGeeks.
Выход:
Привет, GeeksforGeeks!
В приведенном выше примере параметр декоратора route () содержит переменную часть, прикрепленную к URL-адресу '/ hello' в качестве аргумента. Следовательно, если введен URL-адрес вида http: // localhost: 5000 / hello / GeeksforGeeks, тогда в функцию hello () будет передан аргумент «GeeksforGeeks».
В дополнение к части строковой переменной по умолчанию также используются другие типы данных, такие как int, float и path (для канала разделителя каталогов, который может принимать косую черту). Правила URL-адресов Flask основаны на модуле маршрутизации Werkzeug. Это гарантирует, что сформированные URL-адреса уникальны и основаны на прецедентах, установленных Apache.
Examples:
from flask import Flaskapp = Flask(__name__) @app.route("/blog/<postID>")def show_blog(postID): return "Blog Number %d" % postID @app.route("/rev/<revNo>")def revision(revNo): return "Revision Number %f" % revNo if __name__ == "__main__": app.run() # say the URL is http://localhost:5000/blog/555 |
Выход :
Blog Number 555

# Enter this URL in the browser ? http://localhost:5000/rev/1.1
Revision Number: 1.100000
Building URL in FLask:
Dynamic Building of the URL for a specific function is done using url_for() function. The function accepts the name of the function as first argument, and one or more keyword arguments. See this example
from flask import Flask, redirect, url_forapp = Flask(__name__) @app.route("/admin") #decorator for route(argument) functiondef hello_admin(): #binding to hello_admin call return "Hello Admin" @app.route("/guest/<guest>")def hello_guest(guest): #binding to hello_guest call return "Hello %s as Guest" % guest @app.route("/user/<name>")def hello_user(name): if name =="admin": #dynamic binding of URL to function return redirect(url_for("hello_admin")) else: return redirect(url_for("hello_guest", guest = name)) if __name__ == "__main__": app.run(debug = True) |
Чтобы проверить это, сохраните приведенный выше код и запустите оболочку python, а затем откройте браузер и введите следующий URL-адрес: -
Ввод: http: // localhost: 5000 / user / admin
Вывод: Здравствуйте, администратор

Ввод: http: // localhost: 5000 / user / ABC
Вывод: Hello ABC as Guest
В приведенном выше коде есть функция с именем user (name), принимающая значение через входной URL. Он проверяет, соответствует ли полученный аргумент аргументу admin или нет. Если он совпадает, то вызывается функция hello_admin (), иначе вызывается hello_guest ().
Flask поддерживает различные протоколы HTTP для получения данных с указанного URL-адреса, их можно определить как: -
| Метод | Описание |
|---|---|
| ПОЛУЧАТЬ | Это используется для отправки данных в форме без шифрования на сервер. |
| ГОЛОВА | предоставляет тело ответа форме |
| ПОЧТА | Отправляет данные формы на сервер. Данные, полученные методом POST, сервером не кэшируются. |
| ПОЛОЖИЛ | Заменяет текущее представление целевого ресурса на URL. |
| УДАЛЯТЬ | Удаляет целевой ресурс данного URL |
Handling Static Files :
A web application often requires a static file such as javascript or a CSS file to render the display of the web page in browser. Usually, the web server is configured to set them, but during development, these files are served as static folder in your package or next to the module. See the example in JavaScript given below:
from flask import Flask, render_templateapp = Flask(__name__) @app.route("/")def index(): return render_template("index.html") if __name__ == "__main__": app.run(debug = True) |
The following HTML code:
This will be inside templates folder which will be sibling of the python file we wrote above
<html> <head> <script type = "text/javascript" src = "{{ url_for("static", filename = "hello.js") }}" ></script> </head> <body> <input type = "button" onclick = "sayHello()" value = "Say Hello" /> </body> </html> |
The JavaScript file for hello.js is:
This code will be inside static folder which will be sibling of the templates folder
function sayHello() { alert("Hello World")} |
The above hello.js file will be rendered accordingly to the HTML file.
Object Request of Data from a client’s web page is send to the server as a global request object. It is then processed by importing the Flask module. These consist of attributes like Form(containing Key-Value Pair), Args(parsed URL after question mark(?)), Cookies(contain Cookie names and Values), Files(data pertaining to uploaded file) and Method(current request).
Cookies:
A Cookie is a form of text file which is stored on a client’s computer, whose purpose is to remember and track data pertaining to client’s usage in order to improve the website according to the user’s experience and statistic of webpage.
The Request object contains cookie’s attribute. It is the dictionary object of all the cookie variables and their corresponding values. It also contains expiry time of itself. In Flask, cookie are set on response object.See the example given below:-
from flask import Flaskapp = Flask(__name__)@app.route("/")def index(): return render_template("index.html") |
HTML code for index.html
<html> <body> <form action = "/setcookie" method = "POST"> <p><h3>Enter userID</h3></p> <p><input type = "text" name = "nm"/></p> <p><input type = "submit" value = "Login"/></p> </form> </body></html> |
Add this code to the python file defined above
@app.route("/setcookie", methods = ["POST", "GET"])def setcookie(): if request.method == "POST": user = request.form["nm"] resp = make_response(render_template("cookie.html")) resp.set_cookie("userID", user) return resp @app.route("/getcookie")def getcookie(): name = request.cookies.get("userID") return "<h1>welcome "+name+"</h1>" |
HTML code for cookie.html
<html> <body> <a href="/getcookie">Click me to get Cookie</a> </body></html> |
Запустите указанное выше приложение и перейдите по ссылке в браузере http: // localhost: 5000 /
Форма установлена на '/ setcookie', а набор функций содержит идентификатор пользователя с именем Cookie, который будет отображаться на другой веб-странице. Файл cookie.html содержит гиперссылку на другую функцию просмотра getcookie (), которая отображает значение в браузере.
Сессии во Flask:
В сеансе данные хранятся на сервере. Его можно определить как интервал времени, в течение которого клиент входит на сервер, пока пользователь не выйдет из системы. Данные между ними хранятся во временной папке на сервере. Каждому пользователю назначается определенный идентификатор сеанса . Объект Session - это словарь, который содержит пару "ключ-значение" переменных, связанных с сеансом. SECRET_KEY используется для хранения зашифрованных данных в cookie.
Например:
 Session [key] = value // сохраняет значение сеанса
Session.pop (key, None) // освобождает переменную сеанса
Other Important Flask Functions:redirect(): It is used to return the response of an object and redirects the user to another target location with specified status code.
Syntax: Flask.redirect(location, statuscode, response)
// местоположение используется для перенаправления на желаемый URL
// код состояния отправляет значение заголовка, по умолчанию 302
// ответ используется для инициирования ответа.
abort : используется для обработки ошибки в коде.
Синтаксис: Flask.abort (код)
Параметр кода может принимать следующие значения для соответствующей обработки ошибки:
- 400 - за неверный запрос
- 401 - для неподтвержденных
- 403 - для запрещенного запроса
- 404 - Не найдено
- 406 - Для неприемлемо
- 425 - для неподдерживаемых носителей
- 429 - Слишком много запросов
Загрузка файлов во Flask:
Загрузка файлов во Flask очень проста. Ему нужна HTML-форма с атрибутом enctype и обработчиком URL, который извлекает файл и сохраняет объект в желаемом месте. Файлы временно хранятся на сервере, а затем в желаемом месте.
HTML-синтаксис, обрабатывающий URL-адрес загрузки:
form action = "http: // localhost: 5000 / uploader" method = "POST" enctype = "multipart / form-data"
and following python code of Flask is:
from flask import Flask, render_template, requestfrom werkzeug import secure_filenameapp = Flask(__name__) @app.route("/upload")def upload_file(): return render_template("upload.html") @app.route("/uploader", methods = ["GET", "POST"])def upload_file(): if request.method == "POST": f = request.files["file"] f.save(secure_filename(f.filename)) return "file uploaded successfully" if __name__ == "__main__": app.run(debug = True) |
Sending Form Data to the HTML File of Server:
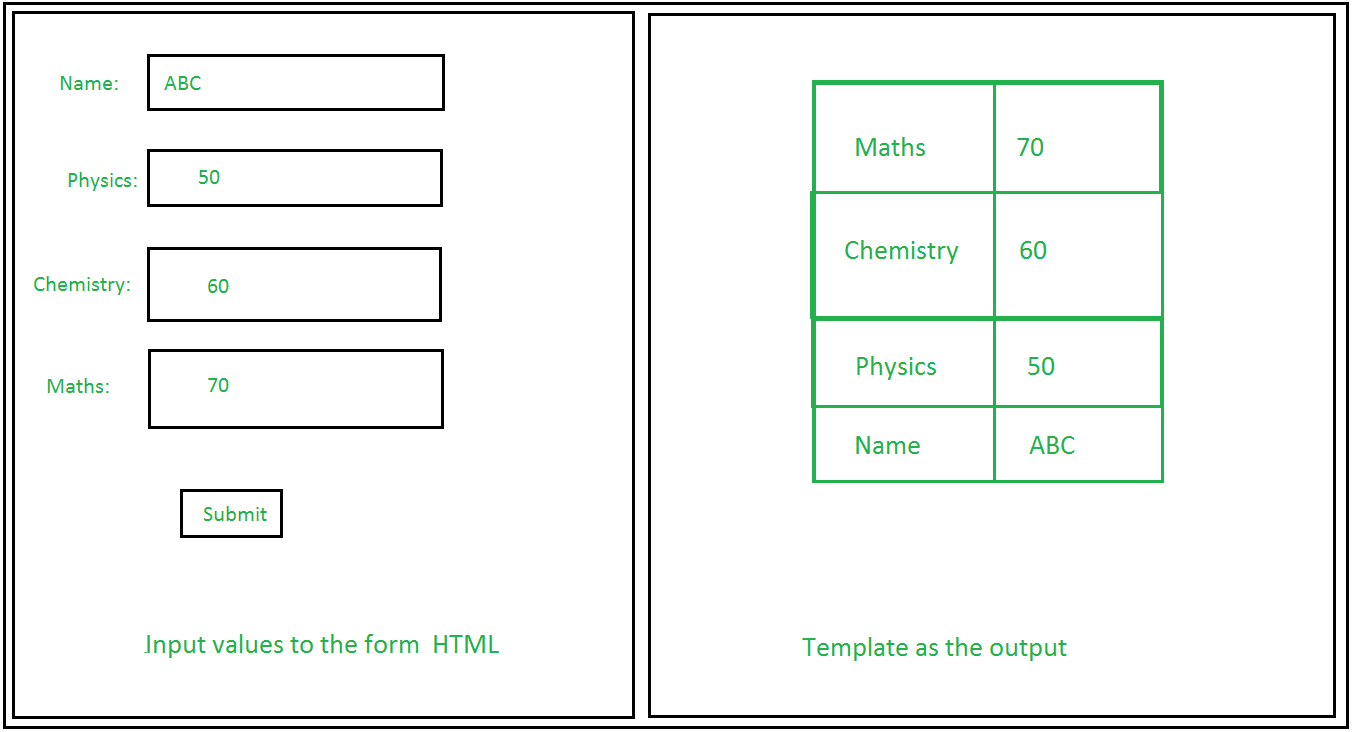
A Form in HTML is used to collect the information of required entries which are then forwarded and stored on the server. These can be requested to read or modify the form. The flask provides this facility by using the URL rule. In the given example below, the ‘/’ URL renders a web page(student.html) which has a form. The data filled in it is posted to the ‘/result’ URL which triggers the result() function. The results() function collects form data present in request.form in a dictionary object and sends it for rendering to result.html.
from flask import Flask, render_template, requestapp = Flask(__name__)@app.route("/")def student(): return render_template("student.html") @app.route("/result", methods = ["POST", "GET"])def result(): if request.method == "POST": result = request.form return render_template("result.html", result = result) if __name__ == "__main__": app.run(debug = True) |
<!doctype html><html> <body> <table border = 1> {% for key, value in result.items() %} <tr> <th> {{ key }} </th> <td> {{ value }} </td> </tr> {% endfor %} </table> </body></html> |
<html> <body> <p>Name <input type = "text" name = "Name" /></p> <p>Physics <input type = "text" name = "Physics" /></p> <p>Chemistry <input type = "text" name = "chemistry" /></p> <p>Maths <input type ="text" name = "Maths" /></p> <p><input type = "submit" value = "submit" /></p> </form> </body></html> |
Сообщение мигает:
Его можно определить как всплывающее окно или диалоговое окно, которое появляется на веб-странице, или как предупреждение в JavaScript, которые используются для информирования пользователя. Это можно сделать в Flask с помощью метода flash () в Flask. Он передает сообщение следующему шаблону.
Синтаксис: flash (сообщение, категория)
message - это фактический текст, который будет отображаться, а категория - необязательная, которая должна отображать любую ошибку или информацию.
Example :
from flask import Flaskapp = Flask(__name__) # /login display login form@app.route("/login", methods = ["GET", "POST"]) # login function verify username and passworddef login(): error = None if request.method == "POST": if request.form["username"] != "admin" or request.form["password"] != "admin": error = "Invalid username or password. Please try again !" else: # flashes on successful login flash("You were successfully logged in") return redirect(url_for("index")) return render_template("login.html", error = error) |
Ссылка: Документация Flask
Внимание компьютерщик! Укрепите свои основы с помощью базового курса программирования Python и изучите основы.
Для начала подготовьтесь к собеседованию. Расширьте свои концепции структур данных с помощью курса Python DS. А чтобы начать свое путешествие по машинному обучению, присоединяйтесь к курсу Машинное обучение - базовый уровень.