PyQt5 QListWidget - Получение таблицы стилей
In this article we will see how we can get style sheet to the QListWidget. QListWidget is a convenience class that provides a list view with a classic item-based interface for adding and removing items. QListWidget uses an internal model to manage each QListWidgetItem in the list. Style sheet is the properties which are used to make the appearance better i.e by creating customized design. It can be set with the help of setStyleSheet method. It can be set with the help of setStyleSheet method.
In order to do this we will use
styleSheetmethod with the list widget object.Syntax : list_widget.styleSheet()
Argument : It takes argument
Return : It returns string
Ниже приведен пример кода таблицы стилей
QListWidget
{
граница: сплошной черный цвет 2px;
фон: светло-зеленый;
}
QListWidget QScrollBar
{
фон: светло-голубой;
}
 QListView :: item: selected
{
граница: сплошной черный цвет 2px;
фон: зеленый;
}
Below is the implementation
# importing librariesfrom PyQt5.QtWidgets import * from PyQt5 import QtCore, QtGuifrom PyQt5.QtGui import * from PyQt5.QtCore import * import sys class Window(QMainWindow): def __init__(self): super().__init__() # setting title self.setWindowTitle("Python ") # setting geometry self.setGeometry(100, 100, 500, 400) # calling method self.UiComponents() # showing all the widgets self.show() # method for components def UiComponents(self): # creating a QListWidget list_widget = QListWidget(self) # setting geometry to it list_widget.setGeometry(50, 70, 150, 80) # list widget items item1 = QListWidgetItem("PyQt5 Geeks for Geeks") item2 = QListWidgetItem("B") item3 = QListWidgetItem("C") item4 = QListWidgetItem("D") # adding items to the list widget list_widget.addItem(item1) list_widget.addItem(item2) list_widget.addItem(item3) list_widget.addItem(item4) # setting style sheet list_widget.setStyleSheet("QListWidget" "{" "border : 2px solid black;" "background : lightgreen;" "}" "QListWidget QScrollBar" "{" "background : lightblue;" "}" "QListView::item:selected" "{" "border : 2px solid black;" "background : green;" "}" ) # creating a label label = QLabel("GeesforGeeks", self) # setting geometry to the label label.setGeometry(230, 80, 280, 80) # making label multi line label.setWordWrap(True) # getting style sheet value = list_widget.styleSheet() # setting text to the label label.setText(value) # create pyqt5 appApp = QApplication(sys.argv) # create the instance of our Windowwindow = Window() # start the appsys.exit(App.exec()) |
Выход : 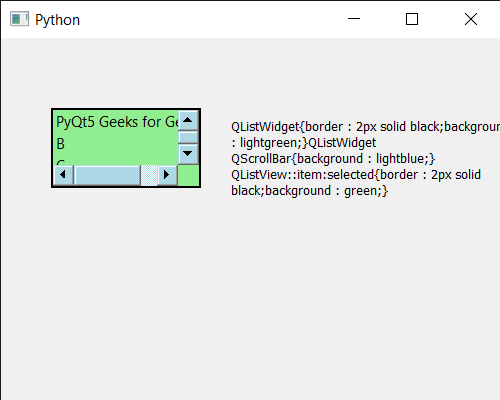
Внимание компьютерщик! Укрепите свои основы с помощью базового курса программирования Python и изучите основы.
Для начала подготовьтесь к собеседованию. Расширьте свои концепции структур данных с помощью курса Python DS. А чтобы начать свое путешествие по машинному обучению, присоединяйтесь к курсу Машинное обучение - базовый уровень.