PyQt5 - QActionGroup
QActionGroup: в приложениях PyQt5 многие общие команды можно вызывать через меню, кнопки панели инструментов и сочетания клавиш, поскольку пользователь ожидает, что каждая команда будет выполняться одинаково, независимо от используемого пользовательского интерфейса, QAction полезно представлять каждую команду как действие. В некоторых ситуациях полезно сгруппировать объекты QAction вместе, чтобы пользователь мог выбирать (проверять) только одно QAction за раз, как и радиокнопки. Также для того, чтобы видеть группу действий эффекта или действия, добавленное к ней действие должно быть отмечено флажком.
Ниже показано, как действия в группе действий будут выглядеть внутри меню. 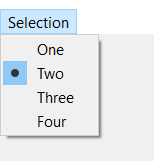
Синтаксис:
action_group = QActionGroup ()
This action_group is used by adding those QAction which should lie in same group, they can be added with the help of addAction method. Below are the some frequently used commands with the QAction
addAction : To add QAction to it

setEnabled : To make QActionGroup enable or disable

setExclusionPolicy : To set exclusion policy to the action group

checkedAction : It returns the currently checked action

removeAction : To remove the specific QAction from the group

actions : It returns the list of QAction group is having
Пример :
Здесь мы создадим строку меню, в которой будет меню и несколько проверяемых QAction, ниже - реализация
# importing librariesfrom PyQt5.QtWidgets import * from PyQt5 import QtCore, QtGuifrom PyQt5.QtGui import * from PyQt5.QtCore import * import sys class Window(QMainWindow): def __init__(self): super().__init__() # setting title self.setWindowTitle("Python ") # setting geometry self.setGeometry(100, 100, 500, 400) # calling method self.UiComponents() # showing all the widgets self.show() # method for components def UiComponents(self): # creating a menu bar menubar = self.menuBar() # creating a selection menu selMenu = menubar.addMenu("Selection") # creating QAction Instances action1 = QAction("One", self) action2 = QAction("Two", self) action3 = QAction("Three", self) action4 = QAction("Four", self) # making actions checkable action1.setCheckable(True) action2.setCheckable(True) action3.setCheckable(True) action4.setCheckable(True) # adding these actions to the selection menu selMenu.addAction(action1) selMenu.addAction(action2) selMenu.addAction(action3) selMenu.addAction(action4) # creating a action group action_group = QActionGroup(self) # adding these action to the action group action_group.addAction(action1) action_group.addAction(action2) action_group.addAction(action3) action_group.addAction(action4) # creating a label label = QLabel("GeeksforGeeks", self) # setting geometry to the label label.setGeometry(100, 150, 200, 50) # adding triggered action to the first action action1.triggered.connect(lambda: label.setText("Action 1 is Checked")) # adding triggered action to the second action action2.triggered.connect(lambda: label.setText("Action 2 is Checked")) # adding triggered action to the third action action3.triggered.connect(lambda: label.setText("Action 3 is Checked")) # adding triggered action to the third action action4.triggered.connect(lambda: label.setText("Action 4 is Checked")) # create pyqt5 appApp = QApplication(sys.argv) # create the instance of our Windowwindow = Window() # start the appsys.exit(App.exec()) |
Выход : 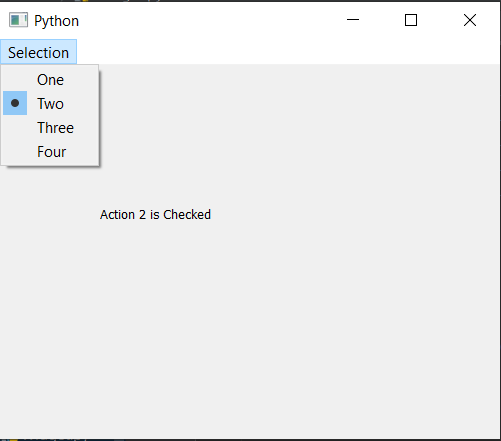
Another Example
In this we will create a tool bar having multiple QAction which are dived by two action group, below is the implementation
# importing librariesfrom PyQt5.QtWidgets import * from PyQt5 import QtCore, QtGuifrom PyQt5.QtGui import * from PyQt5.QtCore import * import sys class Window(QMainWindow): def __init__(self): super().__init__() # setting title self.setWindowTitle("Python ") # setting geometry self.setGeometry(100, 100, 500, 400) # calling method self.UiComponents() # showing all the widgets self.show() # method for components def UiComponents(self): # creating a tool bar toolbar = QToolBar(self) # setting geometry to the tool bar toolbar.setGeometry(50, 100, 300, 35) # creating QAction Instances action1 = QAction("One", self) action2 = QAction("Two", self) action3 = QAction("Three", self) action4 = QAction("Four", self) # making actions checkable action1.setCheckable(True) action2.setCheckable(True) action3.setCheckable(True) action4.setCheckable(True) # adding these actions to the tool bar toolbar.addAction(action1) toolbar.addAction(action2) toolbar.addAction(action3) toolbar.addAction(action4) # creating a first action group action_group1 = QActionGroup(self) # adding these action to the action group action_group1.addAction(action1) action_group1.addAction(action2) # creating a second action group action_group2 = QActionGroup(self) action_group2.addAction(action3) action_group2.addAction(action4) # creating a label label = QLabel("GeeksforGeeks", self) # setting geometry to the label label.setGeometry(100, 150, 200, 50) # adding triggered action to the first action action1.triggered.connect(lambda: label.setText("Action 1 is Checked")) # adding triggered action to the second action action2.triggered.connect(lambda: label.setText("Action 2 is Checked")) # adding triggered action to the third action action3.triggered.connect(lambda: label.setText("Action 3 is Checked")) # adding triggered action to the third action action4.triggered.connect(lambda: label.setText("Action 4 is Checked")) # create pyqt5 appApp = QApplication(sys.argv) # create the instance of our Window window = Window() # start the app sys.exit(App.exec()) |
Выход :
Внимание компьютерщик! Укрепите свои основы с помощью базового курса программирования Python и изучите основы.
Для начала подготовьтесь к собеседованию. Расширьте свои концепции структур данных с помощью курса Python DS. А чтобы начать свое путешествие по машинному обучению, присоединяйтесь к курсу Машинное обучение - базовый уровень.