Поверните изображение без обрезания сторон с помощью Python - OpenCV
Предварительное условие : обработка изображений в Python (масштабирование, поворот, сдвиг и обнаружение краев)
Вращать изображения с помощью OpenCV легко, но иногда простые задачи поворота обрезают / обрезают стороны изображения, что приводит к получению половины изображения. Теперь, в этом руководстве, мы рассмотрим решение для безопасного поворота изображения без обрезки / обрезки сторон изображения, чтобы все изображение было включено в поворот, а также сравним традиционный метод поворота с модифицированной версией поворота.
Пошаговый подход:
- Чтобы повернуть изображение без обрезания сторон, мы создадим явную функцию с именем ModifedWay (), которая будет принимать само изображение и угол поворота изображения в качестве аргумента.
- В функции сначала получите высоту и ширину изображения.
- Найдите центр изображения.
- Затем вычислите двумерную матрицу вращения
- Извлеките абсолютные значения sin и cos из матрицы вращения.
- Получите новую высоту и ширину изображения и обновите значения матрицы вращения, чтобы гарантировать отсутствие обрезки.
- Наконец, используйте метод wrapAffine (), чтобы выполнить фактическое вращение изображения.
Below is the implementation of the approach:
Python3
def ModifiedWay(rotateImage, angle): # Taking image height and width imgHeight, imgWidth = rotateImage.shape[0], rotateImage.shape[1] # Computing the centre x,y coordinates # of an image centreY, centreX = imgHeight//2, imgWidth//2 # Computing 2D rotation Matrix to rotate an image rotationMatrix = cv2.getRotationMatrix2D((centreX, centreY), angle, 1.0) # Now will take out sin and cos values from rotationMatrix # Also used numpy absolute function to make positive value cosofRotationMatrix = np.abs(rotationMatrix[0][0]) sinofRotationMatrix = np.abs(rotationMatrix[0][1]) # Now will compute new height & width of # an image so that we can use it in # warpAffine function to prevent cropping of image sides newImageHeight = int((imgHeight * sinofRotationMatrix) + (imgWidth * cosofRotationMatrix)) newImageWidth = int((imgHeight * cosofRotationMatrix) + (imgWidth * sinofRotationMatrix)) # After computing the new height & width of an image # we also need to update the values of rotation matrix rotationMatrix[0][2] += (newImageWidth/2) - centreX rotationMatrix[1][2] += (newImageHeight/2) - centreY # Now, we will perform actual image rotation rotatingimage = cv2.warpAffine( rotateImage, rotationMatrix, (newImageWidth, newImageHeight)) return rotatingimage |
Ниже приведены несколько примеров, показывающих, как повернуть изображение, не обрезая стороны, с помощью вышеуказанной функции:
Пример 1:
Below is the implementation of the modified rotation version along with its comparison with normal rotation version:
Python3
# Importing Required Librariesimport cv2import numpy as np# The below function is for conventionally way of rotating# an Image without preventing cutting off sidesdef SimpleWay(rotateImage, angle): # Taking image height and width imgHeight, imgWidth = rotateImage.shape[0], rotateImage.shape[1] # Computing the centre x,y coordinates # of an image centreY, centreX = imgHeight//2, imgWidth//2 # Computing 2D rotation Matrix to rotate an image rotationMatrix = cv2.getRotationMatrix2D((centreY, centreX), angle, 1.0) # Now, we will perform actual image rotation rotatingimage = cv2.warpAffine( rotateImage, rotationMatrix, (imgWidth, imgHeight)) return rotatingimage# The Below function is a modified version of the# conventional way to rotate an image without# cropping/cutting sides.def ModifiedWay(rotateImage, angle): # Taking image height and width imgHeight, imgWidth = rotateImage.shape[0], rotateImage.shape[1] # Computing the centre x,y coordinates # of an image centreY, centreX = imgHeight//2, imgWidth//2 # Computing 2D rotation Matrix to rotate an image rotationMatrix = cv2.getRotationMatrix2D((centreY, centreX), angle, 1.0) # Now will take out sin and cos values from rotationMatrix # Also used numpy absolute function to make positive value cosofRotationMatrix = np.abs(rotationMatrix[0][0]) sinofRotationMatrix = np.abs(rotationMatrix[0][1]) # Now will compute new height & width of # an image so that we can use it in # warpAffine function to prevent cropping of image sides newImageHeight = int((imgHeight * sinofRotationMatrix) + (imgWidth * cosofRotationMatrix)) newImageWidth = int((imgHeight * cosofRotationMatrix) + (imgWidth * sinofRotationMatrix)) # After computing the new height & width of an image # we also need to update the values of rotation matrix rotationMatrix[0][2] += (newImageWidth/2) - centreX rotationMatrix[1][2] += (newImageHeight/2) - centreY # Now, we will perform actual image rotation rotatingimage = cv2.warpAffine( rotateImage, rotationMatrix, (newImageWidth, newImageHeight)) return rotatingimage# Driver Code# Loading an Image from DiskDogImage = cv2.imread("doggy.png", 1)# Performing 40 degree rotationNormalRotation = SimpleWay(DogImage, 40)ModifiedVersionRotation = ModifiedWay(DogImage, 40)# Display image on Screencv2.imshow("Original Image", DogImage)# Display rotated image on Screencv2.imshow("Normal Rotation", NormalRotation)cv2.imshow("Modified Version Rotation", ModifiedVersionRotation)# To hold the GUI screen and control until it is detected# the input for closing it, Once it is closed# control will be releasedcv2.waitKey(0)# To destroy and remove all created GUI windows from#screen and memorycv2.destroyAllWindows() |
Выход:

Исходное изображение
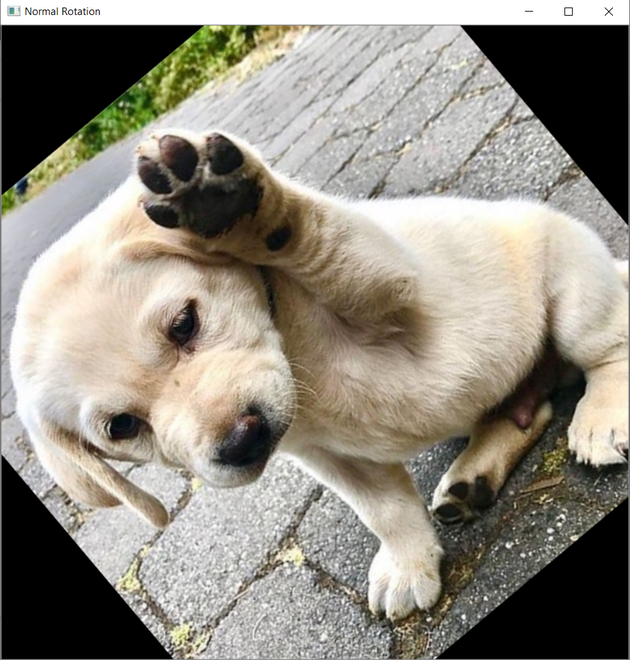
Нормальное вращение с функцией SimpleWay ()
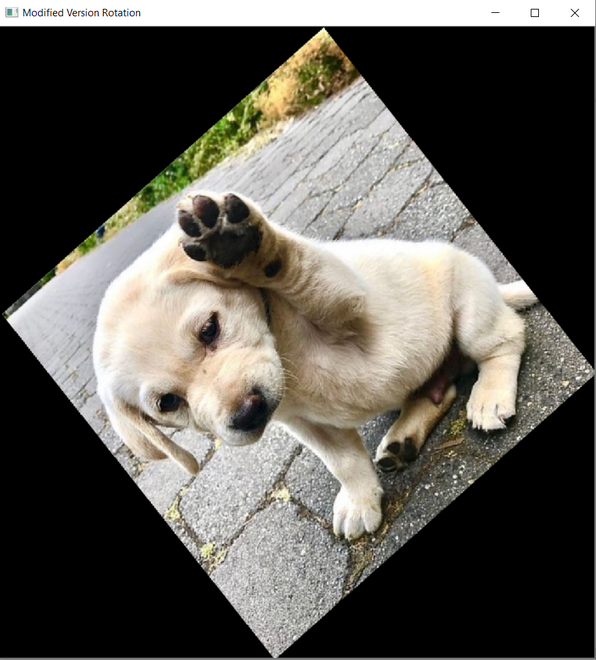
Вращение с функцией ModifiedWay ()
Пример 2:
Here is another example that depicts the modern rotation method:
Python3
# Importing Required Librariesimport cv2import numpy as np# The Below function is a modified version of the# conventional way to rotate an image without# cropping/cutting sides.def ModifiedWay(rotateImage, angle): # Taking image height and width imgHeight, imgWidth = rotateImage.shape[0], rotateImage.shape[1] # Computing the centre x,y coordinates # of an image centreY, centreX = imgHeight//2, imgWidth//2 # Computing 2D rotation Matrix to rotate an image rotationMatrix = cv2.getRotationMatrix2D((centreY, centreX), angle, 1.0) # Now will take out sin and cos values from rotationMatrix # Also used numpy absolute function to make positive value cosofRotationMatrix = np.abs(rotationMatrix[0][0]) sinofRotationMatrix = np.abs(rotationMatrix[0][1]) # Now will compute new height & width of # an image so that we can use it in # warpAffine function to prevent cropping of image sides newImageHeight = int((imgHeight * sinofRotationMatrix) + (imgWidth * cosofRotationMatrix)) newImageWidth = int((imgHeight * cosofRotationMatrix) + (imgWidth * sinofRotationMatrix)) # After computing the new height & width of an image # we also need to update the values of rotation matrix rotationMatrix[0][2] += (newImageWidth/2) - centreX rotationMatrix[1][2] += (newImageHeight/2) - centreY # Now, we will perform actual image rotation rotatingimage = cv2.warpAffine( rotateImage, rotationMatrix, (newImageWidth, newImageHeight)) return rotatingimage# Driver Code# Loading an Image from DiskImage = cv2.imread("gfg.png", 1)# Performing 40 degree rotationModifiedVersionRotation = ModifiedWay(Image, 40)# Display image on Screencv2.imshow("Original Image", Image)# Display rotated image on Screencv2.imshow("Modified Version Rotation", ModifiedVersionRotation)# To hold the GUI screen and control until it is detected# the input for closing it, Once it is closed# control will be releasedcv2.waitKey(0)# To destroy and remove all created GUI windows from#screen and memorycv2.destroyAllWindows() |
Выход:


Внимание компьютерщик! Укрепите свои основы с помощью базового курса программирования Python и изучите основы.
Для начала подготовьтесь к собеседованию. Расширьте свои концепции структур данных с помощью курса Python DS. А чтобы начать свое путешествие по машинному обучению, присоединяйтесь к курсу Машинное обучение - базовый уровень.