Отрисовка полей формы Django вручную
Поля формы Django имеют несколько встроенных методов для облегчения работы разработчика, но иногда необходимо реализовать что-то вручную для настройки пользовательского интерфейса (UI). Мы уже рассмотрели, как создать и использовать форму в Django ?. Форма имеет 3 встроенных метода, которые можно использовать для отображения полей формы Django.
- {{form.as_table}} отобразит их как ячейки таблицы, заключенные в теги <tr>
- {{form.as_p}} отобразит их заключенными в теги <p>
- {{form.as_ul}} отобразит их заключенными в теги <li>.
Они визуализируют форму автоматически, но если вы хотите создать красивую форму с некоторыми эффектами CSS, вам необходимо визуализировать поля формы вручную. Эта статья посвящена тому, как вручную отрисовывать поля формы.
Отображение полей формы вручную
Illustration of Rendering Django Forms Manually using an Example. Consider a project named geeksforgeeks having an app named geeks.
Refer to the following articles to check how to create a project and an app in Django.
- How to Create a Basic Project using MVT in Django?
- How to Create an App in Django ?
In your geeks app make a new file called forms.py where you would be making all your forms. To create a Django form you need to use Django Form Class. Let’s demonstrate how,
In your forms.py Enter the following,
from django import forms # creating a form class InputForm(forms.Form): first_name = forms.CharField(max_length = 200) last_name = forms.CharField(max_length = 200) roll_number = forms.IntegerField( help_text = "Enter 6 digit roll number" ) password = forms.CharField(widget = forms.PasswordInput()) |
Let’s explain what exactly is happening, left side denotes the name of the field and to right of it, you define various functionalities of an input field correspondingly. A field’s syntax is denoted as
Syntax :
Field_name = forms.FieldType(attributes)
Now to render this form into a view, move to views.py and create a home_view as below.
from django.shortcuts import renderfrom .forms import InputForm # Create your views here.def home_view(request): context ={} context["form"]= InputForm() return render(request, "home.html", context) |
In view one needs to just create an instance of the form class created above in forms.py.
Now let’s edit templates > home.html
<form action = "" method = "post"> {% csrf_token %} {{form }} <input type="submit" value=Submit"></form> |
All set to check if form is working or not let’s visit http://localhost:8000/ .
.
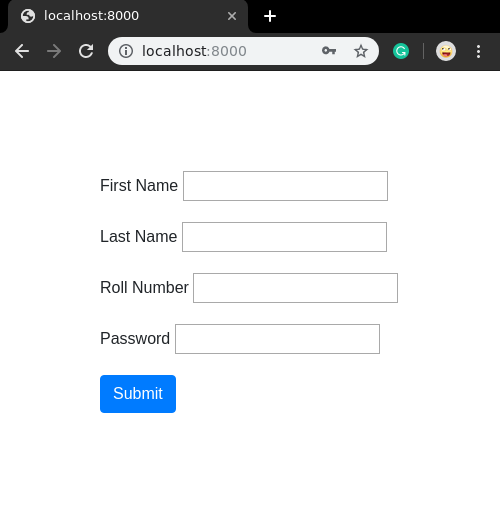
Form is working properly but visuals are disappointing, We can render these fields manually to improve some visual stuff. Each field is available as an attribute of the form using {{ form.name_of_field }}, and in a Django template, will be rendered appropriately. For example:
{{ form.non_field_errors }}
<div class="fieldWrapper">
    {{ form.subject.errors }}
    <label for="{{ form.subject.id_for_label }}">Email subject:</label>
    {{ form.subject }}
</div>
.
Let’s modify our form to look pretty impressive,
<html> <head> <link rel="stylesheet" <style> .i-am-centered { margin: auto; max-width: 300px; padding-top: 20%; } </style></head> <body> <div class="i-am-centered"> <form method="POST"> {% csrf_token %} <div class="form-group"> <label>First Name </label> {{ form.first_name }} </div> <div class="form-group"> <label>Last Name </label> {{ form.last_name }} </div> <div class="form-group"> <label>Roll Number</label> {{ form.roll_number }} </div> <div class="form-group"> <label>Password</label> {{ form.password }} </div> <button type="submit" class="btn btn-primary">Submit</button> </form> </div></body> </html> |
Now visit http://localhost:8000/ and check modified form.
These were just some basic modifications using Bootstrap. One can customize it to an advanced level using various CSS tricks and methods.
{{ field }} attributes
- {{ field.label }}
The label of the field, e.g. Email address. - {{ field.label_tag }}
The field’s label wrapped in the appropriate HTML
Attention geek! Strengthen your foundations with the Python Programming Foundation Course and learn the basics.
To begin with, your interview preparations Enhance your Data Structures concepts with the Python DS Course. And to begin with your Machine Learning Journey, join the Machine Learning – Basic Level Course