MultipleChoiceField - формы Django
MultipleChoiceField в Django Forms - это поле выбора для ввода нескольких пар значений из поля. Виджет по умолчанию для этого входа - SelectMultiple. Он нормализуется до списка строк Python, который можно использовать для нескольких целей.
MultipleChoiceField имеет один обязательный аргумент:
- выбор: - Либо итерация 2-кортежей использовать в качестве вариантов для этой области, или вызываемые , что возвращает такую итерацию.
Синтаксис
field_name = forms.MultipleChoiceField (** параметры)
Форма Django MultipleChoiceField Описание
Illustration of MultipleChoiceField using an Example. Consider a project named geeksforgeeks having an app named geeks.
Refer to the following articles to check how to create a project and an app in Django.
- How to Create a Basic Project using MVT in Django?
- How to Create an App in Django ?
Enter the following code into forms.py file of geeks app.
from django import forms DEMO_CHOICES =( ("1", "Naveen"), ("2", "Pranav"), ("3", "Isha"), ("4", "Saloni"),)class GeeksForm(forms.Form): geeks_field = forms.MultipleChoiceField(choices = DEMO_CHOICES) |
Add the geeks app to INSTALLED_APPS
# Application definition INSTALLED_APPS = [ "django.contrib.admin", "django.contrib.auth", "django.contrib.contenttypes", "django.contrib.sessions", "django.contrib.messages", "django.contrib.staticfiles", "geeks",] |
Now to render this form into a view we need a view and a URL mapped to that URL. Let’s create a view first in views.py of geeks app,
from django.shortcuts import renderfrom .forms import GeeksForm # Create your views here.def home_view(request): context = {} context["form"] = GeeksForm() return render( request, "home.html", context) |
Here we are importing that particular form from forms.py and creating an object of it in the view so that it can be rendered in a template.
Now, to initiate a Django form you need to create home.html where one would be designing the stuff as they like. Let’s create a form in home.html.
<form method="POST"> {% csrf_token %} {{ form.as_p }} <input type="submit" value="Submit"></form> |
Finally, a URL to map to this view in urls.py
from django.urls import path # importing views from views..pyfrom .views import home_view urlpatterns = [ path("", home_view ),] |
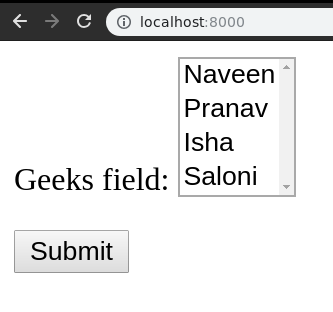
Let’s run the server and check what has actually happened, Run
Python manage.py runserver

Thus, an geeks_field MultipleChoiceField is created by replacing “_” with ” “. It is a field to input of Choices from a list.
How to use MultipleChoiceField ?
MultipleChoiceField is used for input of Choices in the database. One can input Gender, etc. Till now we have discussed how to implement MultipleChoiceField but how to use it in the view for performing the logical part. To perform some logic we would need to get the value entered into the field into a python string instance. To get Github code of working MultipleChoiceField, click here.
In views.py,
from django.shortcuts import renderfrom .forms import GeeksForm # Create your views here.def home_view(request): context = {} form = GeeksForm(request.POST or None) context["form"]= form if request.POST: if form.is_valid(): temp = form.cleaned_data.get("geeks_field") print(temp) return render(request, "home.html", context) |
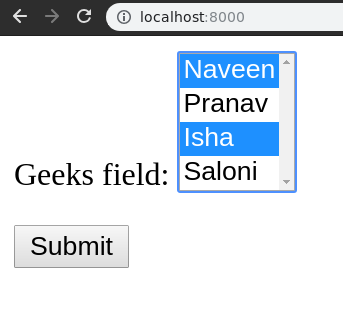
Let’s try selecting Choices data now.
Now this data can be fetched using corresponding request dictionary. If method is GET, data would be available in request.GET and if post, request.POST correspondingly. In above example we have the value in temp which we can use for any purpose. You can check that data is converted to a python list of string instance in geeks_field.

Core Field Arguments
Core Field arguments are the arguments given to each field for applying some constraint or imparting a particular characteristic to a particular Field. For example, adding an argument required = False to MultipleChoiceField will enable it to be left blank by the user. Each Field class constructor takes at least these arguments. Some Field classes take additional, field-specific arguments, but the following should always be accepted:
| Field Options | Description |
|---|---|
| required | By default, each Field class assumes the value is required, so to make it not required you need to set required=False |
| label | The label argument lets you specify the “human-friendly” label for this field. This is used when the Field is displayed in a Form. |
| label_suffix | The label_suffix argument lets you override the form’s label_suffix on a per-field basis. |
| widget | The widget argument lets you specify a Widget class to use when rendering this Field. See Widgets for more information. |
| help_text | The help_text argument lets you specify descriptive text for this Field. If you provide help_text, it will be displayed next to the Field when the Field is rendered by one of the convenience Form methods. |
| error_messages | The error_messages argument lets you override the default messages that the field will raise. Pass in a dictionary with keys matching the error messages you want to override. |
| validators | The validators argument lets you provide a list of validation functions for this field. |
| localize | The localize argument enables the localization of form data input, as well as the rendered output. |
| disabled. | The disabled boolean argument, when set to True, disables a form field using the disabled HTML attribute so that it won’t be editable by users. |
Attention geek! Strengthen your foundations with the Python Programming Foundation Course and learn the basics.
To begin with, your interview preparations Enhance your Data Structures concepts with the Python DS Course. And to begin with your Machine Learning Journey, join the Machine Learning – Basic Level Course