Как создать RecyclerView с несколькими типами просмотра в Android?
RecyclerView составляет очень важную часть пользовательского интерфейса при разработке приложений для Android. Особенно важно оптимизировать потребление памяти при отображении длинного списка элементов. RecylerView расширяет настраиваемый список элементов. В этом списке могут быть как все похожие макеты, так и несколько разных макетов. Вот такой RecyclerView с несколькими ViewTypes разработан. Ниже приведен пример Android RecyclerView с несколькими представлениями. 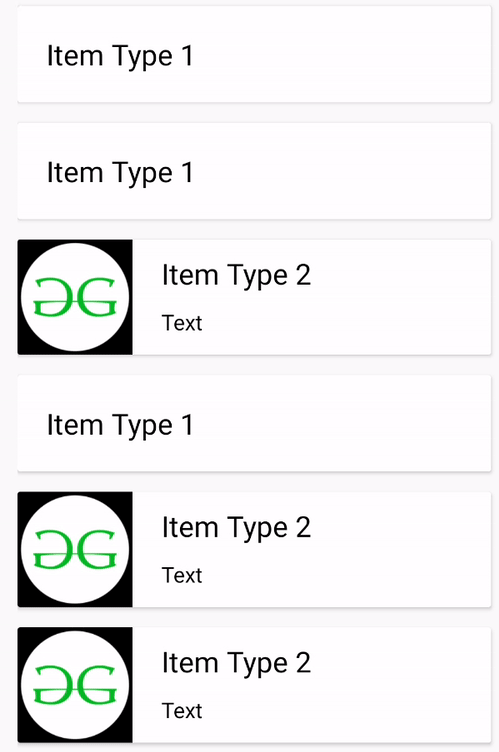
Подход
Шаг 1. Добавьте необходимые зависимости
Создайте новый проект в Android Studio и добавьте следующие зависимости в build.gradle (: app) в разделе Gradle Scripts:
implementation “androidx.recyclerview:recyclerview:1.1.0”
implementation “androidx.cardview:cardview:1.0.0”
Для получения более свежих версий зависимостей щелкните здесь. Хотя первая зависимость является обязательной, вторая не является обязательной в зависимости от требований пользовательского интерфейса. Нажмите « Синхронизировать сейчас» и продолжите.
Шаг 2. Внедрите RecyclerView в activity_main.xml
Создайте макет, содержащий основной RecyclerView. Здесь он был создан в файле activity_main.xml. Данный макет содержит просто приветствие TextView и RecyclerView, однако его можно настроить в соответствии с требованиями. Код для activity_main.xml приведен ниже.
activity_main.xml
<? xml version = "1.0" encoding = "utf-8" ?>< androidx.constraintlayout.widget.ConstraintLayout android:layout_width = "match_parent" android:layout_height = "match_parent" tools:context = ".MainActivity" > <!--Welcome text--> < TextView android:id = "@+id/heading" android:layout_width = "wrap_content" android:layout_height = "wrap_content" android:text = "Welcome to GFG!" android:textColor = "#006600" android:textSize = "20dp" app:layout_constraintBottom_toBottomOf = "parent" app:layout_constraintEnd_toEndOf = "parent" app:layout_constraintStart_toStartOf = "parent" app:layout_constraintTop_toTopOf = "parent" app:layout_constraintVertical_bias = "0.058" ></ TextView > <!-- Main RecyclerView--> < androidx.recyclerview.widget.RecyclerView android:id = "@+id/recyclerView" android:layout_width = "match_parent" android:layout_height = "wrap_content" android:layout_marginTop = "15dp" android:layout_marginStart = "15dp" app:layout_constraintBottom_toBottomOf = "parent" app:layout_constraintEnd_toEndOf = "parent" app:layout_constraintStart_toStartOf = "parent" app:layout_constraintTop_toBottomOf = "@+id/heading" app:layout_constraintVertical_bias = "0.061" android:paddingBottom = "100dp" /> </ androidx.constraintlayout.widget.ConstraintLayout > |
Шаг 3: Добавьте требуемый файл с возможностью рисования
Прежде чем продолжить, убедитесь, что все необходимые ресурсы для рисования добавлены в каталог ресурсов для рисования . В этом руководстве использовался только следующий значок: ![]()
Шаг 4. Создайте макеты всех элементов.
Определите все различные макеты, которые должен содержать RecyclerView, и реализовать их все в отдельных файлах XML в каталоге ресурсов макета. Здесь были созданы два разных макета. Первый реализован в layout_one.xml, а второй - в layout_two.xml. Первый макет состоит только из TextView, заключенного в CardView. Ниже приводится его реализация.
layout_one.xml
<? xml version = "1.0" encoding = "utf-8" ?>< LinearLayout android:layout_width = "match_parent" android:layout_height = "wrap_content" android:orientation = "vertical" > <!--parent CardView--> < androidx.cardview.widget.CardView android:id = "@+id/cardview_one" android:layout_width = "match_parent" android:layout_height = "wrap_content" android:layout_marginTop = "4dp" android:layout_marginEnd = "16dp" app:layout_constraintEnd_toEndOf = "parent" app:layout_constraintTop_toTopOf = "parent" android:elevation = "5dp" > <!--LinearLayout inside the CardView--> <!--This layout is accessed to create toasts when this item is clicked--> < LinearLayout android:id = "@+id/linearlayout" android:layout_width = "match_parent" android:layout_height = "match_parent" android:orientation = "horizontal" > <!--This layout only holds a TextView inside a CardView--> < TextView android:id = "@+id/text" android:layout_width = "wrap_content" android:layout_height = "wrap_content" android:textColor = "#000000" android:textSize = "20dp" android:layout_margin = "20dp" /> </ LinearLayout > </ androidx.cardview.widget.CardView > <!-- This is extra space given to maintain a gap between two consecutive CardViews--> < Space android:layout_width = "match_parent" android:layout_height = "10dp" /> </ LinearLayout > |
Второй элемент содержит три элемента, заключенных в CardView.
- ImageView
- TextView
- Другой TextView с относительно меньшим размером шрифта
layout_two.xml
<?xml version="1.0" encoding="utf-8"?><LinearLayout android:layout_width="match_parent" android:layout_height="wrap_content" android:orientation="vertical" android:id="@+id/linearlayout" > <!--parent CardView--> <androidx.cardview.widget.CardView android:id="@+id/cardview_two" android:layout_width="match_parent" android:layout_height="wrap_content" android:layout_marginTop="4dp" android:layout_marginEnd="16dp" app:layout_constraintEnd_toEndOf="parent" app:layout_constraintTop_toTopOf="parent" android:elevation="5dp"> <!--LinearLayout inside the CardView--> <!--This layout is accessed to create toasts when this item is clicked--> <LinearLayout android:layout_width="match_parent" android:layout_height="match_parent" android:orientation="horizontal"> <!--This layout consists of an ImageView and two TextViews--> <ImageView android:id="@+id/image" android:layout_width="80dp" android:layout_height="80dp"/> <!-- The purpose of this LinearLayout is to align the two TextViews Vertically--> <LinearLayout android:layout_width="wrap_content" android:layout_height="match_parent" android:orientation="vertical"> <!--These are the 2 TextViews in this layout--> <TextView android:id="@+id/text_one" android:layout_width="wrap_content" android:layout_height="wrap_content" android:layout_marginTop="10dp" android:layout_marginStart="20dp" android:textColor="#000000" android:textSize="20dp"/> <TextView android:id="@+id/text_two" android:layout_width="wrap_content" android:layout_height="wrap_content" android:textColor="#000000" android:textSize="15dp" android:layout_marginTop="10dp" android:layout_marginStart="20dp"/> </LinearLayout> </LinearLayout> </androidx.cardview.widget.CardView> <!-- This is extra space given to maintain a gap between two CardViews--> <Space android:layout_width="match_parent" android:layout_height="10dp"/> </LinearLayout> |
Шаг 5: Создайте класс элемента
Создайте класс Java, содержащий общедоступные конструкторы, соответствующие каждому макету. Таким образом, здесь в файле ItemClass.java были созданы два конструктора. Помимо конструкторов здесь объявлены методы получения и установки. Это сделано для безопасного доступа к закрытым переменным ItemClass вне его. Вот как ItemClass.java ищет макеты, созданные выше:
ItemClass.java
package com.example.android.multilayoutrecyclerview; // ItemClass public class ItemClass { // Integers assigned to each layout // these are declared static so that they can // be accessed from the class name itself // And final so that they are not modified later public static final int LayoutOne = 0 ; public static final int LayoutTwo = 1 ; // This variable ViewType specifies // which out of the two layouts // is expected in the given item private int viewType; // String variable to hold the TextView // of the first item. private String text; // public constructor for the first layout public ItemClass( int viewType, String text) { this .text = text; this .viewType = viewType; } // getter and setter methods for the text variable public String getText() { return text; } public void setText(String text) { this .text = text; } // Variables for the item of second layout icon; private int private String text_one, text_two; // public constructor for the second layout public ItemClass( int viewType, int icon, String text_one, String text_two) { this .icon = icon; this .text_one = text_one; this .text_two = text_two; this .viewType = viewType; } // getter and setter methods for // the variables of the second layout public int geticon() { icon; } return icon; } public void seticon( int icon) { this .icon = icon; } public String getText_one() { return text_one; } public void setText_one(String text_one) { this .text_one = text_one; } public String getText_two() { return text_two; } public void setText_two(String text_two) { this .text_two = text_two; } public int getViewType() { return viewType; } public void setViewType( int viewType) { this .viewType = viewType; }} |
Шаг 6. Создайте класс адаптера
Создайте класс адаптера для отображения содержимого RecyclerView. В классе Adapter для нескольких ViewType RecyclerViews следующий метод переопределяется в дополнение к обычным onCreateViewHolder() , onBindViewHolder() и getItemCount() . getItemViewType() несет полную ответственность за выбор макета, соответствующего каждому элементу. Помимо добавления дополнительного метода, другие изменения включают определение определенного класса ViewHolder для каждого макета элемента. Следуйте приведенному коду для более глубокого понимания.
AdapterClass.java
package com.example.android.multilayoutrecyclerview; import android.view.LayoutInflater;import android.view.View;import android.view.ViewGroup;import android.widget.ImageView;import android.widget.LinearLayout;import android.widget.TextView;import android.widget.Toast; import androidx.annotation.NonNull;import androidx.recyclerview.widget.RecyclerView; import java.util.List; import static com.example.android.multilayoutrecyclerview.ItemClass.LayoutOne;import static com.example.android.multilayoutrecyclerview.ItemClass.LayoutTwo; public class AdapterClass extends RecyclerView.Adapter { private List<ItemClass> itemClassList; // public constructor for this class public AdapterClass(List<ItemClass> itemClassList) { this .itemClassList = itemClassList; } // Override the getItemViewType method. // This method uses a switch statement // to assign the layout to each item // depending on the viewType passed @Override public int getItemViewType( position) int { switch (itemClassList.get(position).getViewType()) { case 0 : return LayoutOne; case 1 : return LayoutTwo; default : return - 1 ; } } // Create classes for each layout ViewHolder. class LayoutOneViewHolder extends RecyclerView.ViewHolder { private TextView textview; private LinearLayout linearLayout; public LayoutOneViewHolder( @NonNull View itemView) { super (itemView); // Find the Views textview = itemView.findViewById(R.id.text); linearLayout = itemView.findViewById(R.id.linearlayout); } // method to set the views that will // be used further in onBindViewHolder method. private void setView(String text) { textview.setText(text); } } // similarly a class for the second layout is also // created. class LayoutTwoViewHolder extends RecyclerView.ViewHolder { private ImageView icon; private TextView text_one, text_two; private LinearLayout linearLayout; public LayoutTwoViewHolder( @NonNull View itemView)РЕКОМЕНДУЕМЫЕ СТАТЬИ |