Как создать приложение-викторину на Android?
Android является операционной системой , которая построена в основном для мобильных телефонов. Он основан на ядре Linux и других программах с открытым исходным кодом. программное обеспечение и разработано Google . В настоящее время Android очень популярен среди студентов, и студенты теперь выбирают Android для своих проектов. Для новичка очень важно создавать детские приложения для Android, чтобы изучать Android. В этой статье давайте создадим простое приложение-викторину на Android с использованием Java. Простое приложение-викторина, которое содержит набор тщательно отобранных вопросов и ответов на них, а также проверяет правильность ответа, данного пользователем. Он перемещается по вопросам с помощью динамического программирования.

Подход
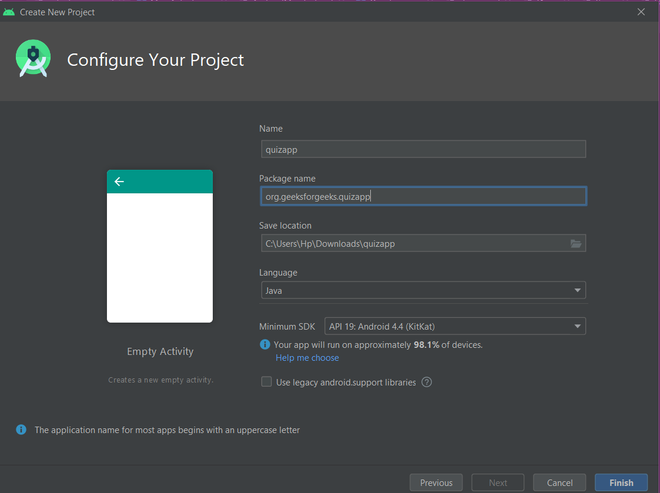
Шаг 1: Создание нового проекта
- Нажмите на параметр Файл в верхнем углу слева.
- Затем нажмите «Новый», откройте новый проект и назовите проект.
- Теперь выберите Пустое действие с языком как Java.
- Назовите его QuizApp .
Шаг 2. Разработка пользовательского интерфейса с помощью activity_main.xml
Добавьте приведенный ниже код в файл activity_main.xml. Здесь родительский макет - это LinearLayout с вертикальной ориентацией. Внутри него есть один ImageView, один TextView, две кнопки и две ImageButton. Button и ImageButton находятся внутри дочернего LinearLayout для горизонтальной ориентации. ImageView используется для отображения изображения, а TextView используется для отображения вопроса, а кнопка используется для указания истинности / ложности и ImageButton для перехода к следующему / предыдущему вопросу.
Добавление изображений в папку с возможностью переноса:
Ниже приведены ссылки для всех файлов с возможностью рисования, которые используются в этом проекте.
- Для изображений цветов (f1 / f2 / f3 / f4 / f5 / f6 / f7): обратитесь к этому.
- Для следующего значка : Обратитесь к этому.
- Для предыдущего значка : обратитесь к этому.
- Для эмодзи : обратитесь к этому.
Полный код файла activity_main.xml приведен ниже.
activity_main.xml
<? xml version = "1.0" encoding = "utf-8" ?><!--Using linear layout with vertical orientation and center gravity --> android:layout_width = "match_parent" android:background = "#FFFFFF" android:layout_height = "match_parent" android:orientation = "vertical" android:gravity = "center" tools:context = ".MainActivity" > <!--ImageView used for showing pictures along with questions--> < ImageView android:id = "@+id/myimage" android:layout_width = "wrap_content" android:src = "@drawable/f1" android:layout_height = "wrap_content" /> <!--TextView used for showing questions on screen--> < TextView android:id = "@+id/answer_text_view" android:text = "@string/a" android:textColor = "@android:color/black" android:textSize = "30sp" android:padding = "10dp" android:layout_width = "wrap_content" android:layout_height = "wrap_content" /> <!--Using another LinearLayout for showing buttons in horizontal orientation--> < LinearLayout android:layout_width = "wrap_content" android:layout_height = "wrap_content" > <!--TrueButton--> < Button android:id = "@+id/true_button" android:layout_marginRight = "20dp" android:backgroundTint = "#5BD91B" android:layout_width = "wrap_content" android:layout_height = "wrap_content" android:textSize = "20sp" android:text = "@string/true_text" /> <!--FalseButton--> < Button android:id = "@+id/false_button" android:layout_marginLeft = "20dp" android:layout_width = "wrap_content" android:backgroundTint = "#E33328" android:layout_height = "wrap_content" android:textSize = "20sp" android:text = "@string/false_text" /> </ LinearLayout > < LinearLayout android:layout_width = "wrap_content" android:layout_height = "wrap_content" > <!--PreviousButton--> < ImageButton android:id = "@+id/prev_button" android:layout_width = "wrap_content" android:layout_height = "wrap_content" android:src = "@drawable/baseline_keyboard_arrow_left_black_18dp" android:backgroundTint = "#DFD2D1" android:text = "@string/prev_text" /> <!--NextButton--> < ImageButton android:id = "@+id/next_button" android:layout_width = "wrap_content" android:layout_height = "wrap_content" android:backgroundTint = "#DFD2D1" android:src = "@drawable/baseline_keyboard_arrow_right_black_18dp" android:text = "@string/next_text" /> </ LinearLayout ></ LinearLayout > |
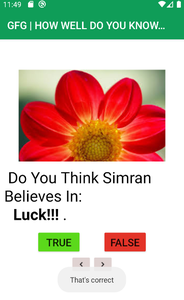
После добавления этого кода в activity_main.xml пользовательский интерфейс выглядит так:
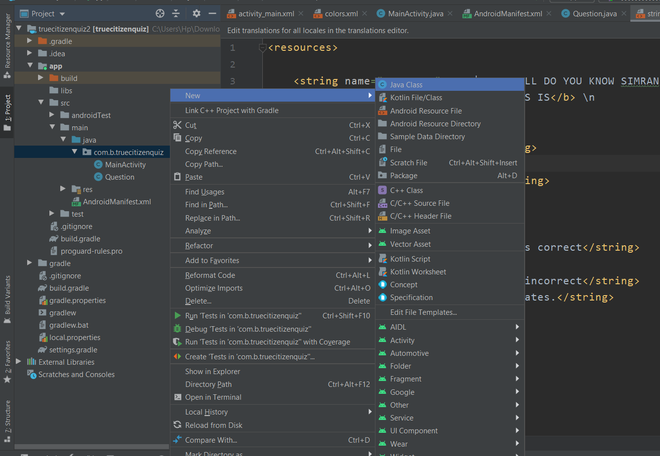
Шаг 3. Работа с Question.java
Чтобы создать новый класс Java, щелкните правой кнопкой мыши файл или папку Java и выберите « Создать»> «Класс Java» .
Теперь добавьте следующий код в файл Question.java . Здесь используются методы получения и установки для извлечения и установки данных. Метод isAnswerTrue () возвращает answerTrue, уже переданный в конструкторе вопросов.
Question.java
package org.geeksforgeeks.quizapp; public class Question{ // answerResId will store question private int answerResId; // answerTrue will store correct answer // of the question provided private boolean answerTrue; public Question( int answerResId, boolean answerTrue) { // setting the values through // arguments passed in constructor this .answerResId = answerResId; this .answerTrue = answerTrue; } // returning the question passed public int getAnswerResId() { return answerResId; } // setting the question passed public void setAnswerResId( int answerResId) { this .answerResId = answerResId; } // returning the correct answer // of question public boolean isAnswerTrue() { return answerTrue; } // setting the correct // ans of question public void setAnswerTrue( boolean answerTrue) { this .answerTrue = answerTrue; }} |
Шаг 4. Работа с файлом strings.xml
В файле strings.xml мы должны предоставить банк вопросов. В этот файл можно добавить много вопросов.
strings.xml
< resources > <!--All the string resources come here including Questions and title --> < string name = "app_name" >GFG | HOW WELL DO YOU KNOW SIMRAN?</ string > < string name = "correct" >< b >CORRECTNESS IS</ b >
< b >%1$d</ b > OUT OF 6</ string > < string name = "true_text" >true</ string > < string name = "false_text" >false</ string > < string name = "correct_answer" >That's correct</ string > < string name = "wrong_answer" >That's incorrect</ string > < string name = "a" >Simran loves Chocolates.</ string > < string name = "b" >Simran Knows Following Skills:
< b >Ballet</ b >
< b >HipHop</ b ></ string > < string name = "c" >Do You Think Simran Believes In:
< b >Luck!!!</ b ></ string > < string name = "d" >Do You Think Simran Wants To Visit < b >Italy</ b ></ string > < string name = "e" >Simran Loves Loyalty.</ string > < string name = "f" >Simran Sleeps Less</ string > < string name = "next_text" >next</ string > < string name = "prev_text" >previous</ string > </ resources > |
Шаг 5: Работа с MainActivity.java
Метод onCreate () вызывается первым при запуске приложения. Создается экземпляр массива Question [] с идентификатором вопроса и правильным ответом на вопрос. Метод setOnClickListener () вызывается всякий раз , когда нажимается кнопка / ImageButton , поэтому, когда пользователь нажимает кнопку, он проверяет свой идентификатор с помощью метода getId () и выполняет действия в соответствии с нашей логикой. updateQuestion () обновляет вопрос с помощью метода settext () TextView и изменяет изображения, отслеживая номер вопроса. Метод checkAnswer () проверяет исходный ответ при нажатой кнопке и использует Toast для соответствующего отображения текста.
MainActivity.java
package org.geeksforgeeks.quizapp; import android.annotation.SuppressLint;import android.os.Build;import android.os.Bundle;import android.util.Log;import android.view.View;import android.widget.Button;import android.widget.ImageButton;import android.widget.ImageView;import android.widget.TextView;import android.widget.Toast;import androidx.annotation.RequiresApi;import androidx.appcompat.app.AppCompatActivity; public class MainActivity extends AppCompatActivity implements View.OnClickListener { // setting up things private Button falseButton; private Button trueButton; private ImageButton nextButton; private ImageButton prevButton; private ImageView Image; private TextView questionTextView; private int correct = 0 ; // to keep current question track private int currentQuestionIndex = 0 ; private Question[] questionBank = new Question[] { // array of objects of class Question // providing questions from string // resource and the correct ans new Question(R.string.a, true ), new Question(R.string.b, false ), new Question(R.string.c, true ), new Question(R.string.d, true ), new Question(R.string.e, true ), new Question(R.string.f, false ), }; @Override protected void onCreate(Bundle savedInstanceState) { super .onCreate(savedInstanceState); setContentView(R.layout.activity_main); // setting up the buttons // associated with id falseButton = findViewById(R.id.false_button); trueButton = findViewById(R.id.true_button); nextButton = findViewById(R.id.next_button); prevButton = findViewById(R.id.prev_button); // register our buttons to listen to // click events questionTextView = findViewById(R.id.answer_text_view); Image = findViewById(R.id.myimage); falseButton.setOnClickListener( this ); trueButton.setOnClickListener( this ); nextButton.setOnClickListener( this ); prevButton.setOnClickListener( this ); } @SuppressLint ( "SetTextI18n" ) @RequiresApi (api = Build.VERSION_CODES.LOLLIPOP) @Override public void onClick(View v) { // checking which button is // clicked by user // in this case user choose false switch (v.getId()) { case R.id.false_button: checkAnswer( false ); break ; case R.id.true_button: checkAnswer( true ); break ; case R.id.next_button: // go to next question // limiting question bank range if (currentQuestionIndex < 7 ) { currentQuestionIndex = currentQuestionIndex + 1 ; // we are safe now! // last question reached // making buttons // invisible if (currentQuestionIndex == 6 ) { questionTextView.setText(getString( R.string.correct, correct)); nextButton.setVisibility( View.INVISIBLE); prevButton.setVisibility( View.INVISIBLE); trueButton.setVisibility( View.INVISIBLE); falseButton.setVisibility( View.INVISIBLE); if (correct > 3 ) questionTextView.setText( "CORRECTNESS IS " + correct + " " + "OUT OF 6" ); // showing correctness else Image.setImageResource( R.drawable.resu); // if correctness<3 showing sad emoji } else { updateQuestion(); } } break ; case R.id.prev_button: if (currentQuestionIndex > 0 ) { currentQuestionIndex = (currentQuestionIndex - 1 ) % questionBank.length; updateQuestion(); } } } @RequiresApi (api = Build.VERSION_CODES.LOLLIPOP) private void updateQuestion() { Log.d( "Current" , "onClick: " + currentQuestionIndex); questionTextView.setText( questionBank[currentQuestionIndex] .getAnswerResId()); // setting the textview with new question switch (currentQuestionIndex) { case 1 : // setting up image for each // question Image.setImageResource(R.drawable.f2); break ; case 2 : Image.setImageResource(R.drawable.f3); break ; case 3 : Image.setImageResource(R.drawable.f4); break ; case 4 : Image.setImageResource(R.drawable.f5); break ; case 5 : Image.setImageResource(R.drawable.f6); break ; case 6 : Image.setImageResource(R.drawable.f7); break ; case 7 : Image.setImageResource(R.drawable.f1); break ; } } private void checkAnswer( boolean userChooseCorrect) { boolean answerIsTrue = questionBank[currentQuestionIndex] .isAnswerTrue(); // getting correct ans of current question int toastMessageId; // if ans matches with the // button clicked if (userChooseCorrect == answerIsTrue) {
РЕКОМЕНДУЕМЫЕ СТАТЬИ |