JavaFX | RadioButton с примерами
RadioButton - это часть пакета JavaFx. RadioButton в основном используются для создания серии элементов, из которых можно выбрать только один. Когда радиокнопка нажата и отпущена, отправляется событие действия, это событие действия может быть обработано с помощью обработчика событий.
RadioButton можно добавить в Toggle Group, чтобы пользователь не мог выбрать более одного элемента. По умолчанию переключатель не является частью какой-либо группы переключателей. Выбранный элемент группы переключения можно найти с помощью функции getSelectedToggle ().
Конструкторы класса RadioButton :
- RadioButton () : создает переключатель с пустой строкой для его метки.
- RadioButton (String t) : создает переключатель с указанным текстом в качестве метки
Обычно используемые методы :
| метод | объяснение |
|---|---|
| getText () | возвращает textLabel для радиокнопки |
| isSelected () | возвращает, выбран ли радиокнопка или нет |
| setSelected (логическое b) | устанавливает, выбран ли радиокнопка или нет |
| setToggleGroup (ToggleGroup tg) | устанавливает группу переключения для переключателя |
| Огонь() | Переключает состояние переключателя тогда и только тогда, когда RadioButton еще не выбран или не является частью ToggleGroup. |
Below programs illustrate the RadioButton class:
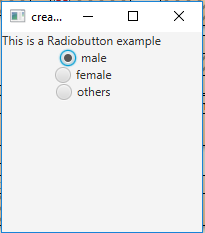
- Program to create RadioButton and add it to the stage: This program creates a RadioButton indicated by the name r1, r2, r3. The radio button will be created inside a scene, which in turn will be hosted inside a stage (which is the top level JavaFX container). The function setTitle() is used to provide title to the stage. Then a tile-pane is created, on which addChildren() method is called to attach the radio button inside the scene, along with the resolution specified by (200, 200) in the code. Finally, the show() method is called to display the final results.
// Java program to create RadioButton and add it to the stageimportjavafx.application.Application;importjavafx.scene.Scene;importjavafx.scene.control.*;importjavafx.scene.layout.*;importjavafx.event.ActionEvent;importjavafx.event.EventHandler;importjavafx.collections.*;importjavafx.stage.Stage;importjavafx.scene.text.Text.*;importjavafx.scene.text.*;publicclassradiobuttonextendsApplication {// launch the applicationpublicvoidstart(Stage s){// set title for the stages.setTitle("creating RadioButton");// create a tile paneTilePane r =newTilePane();// create a labelLabel l =newLabel("This is a Radiobutton example ");// create radiobuttonsRadioButton r1 =newRadioButton("male");RadioButton r2 =newRadioButton("female");RadioButton r3 =newRadioButton("others");// add labelr.getChildren().add(l);r.getChildren().add(r1);r.getChildren().add(r2);r.getChildren().add(r3);// create a sceneScene sc =newScene(r,200,200);// set the scenes.setScene(sc);s.show();}publicstaticvoidmain(String args[]){// launch the applicationlaunch(args);}}Output:

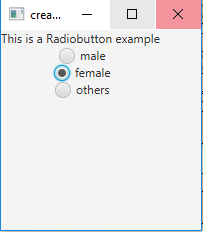
- Program to create RadioButton and add it to a ToggleGroup: This program creates a RadioButton indicated by the name r1, r2, r3. The radio button will be created inside a scene, which in turn will be hosted inside a stage (which is the top level JavaFX container). The function setTitle() is used to provide title to the stage. A toggle group is created and the radio buttons are added to the toggle group using setToggleGroup() function. Then a tile-pane is created, on which addChildren() method is called to attach the radio button inside the scene, along with the resolution specified by (200, 200) in the code. Finally, the show() method is called to display the final results.
// Java Program to create RadioButton and add it to a ToggleGroupimportjavafx.application.Application;importjavafx.scene.Scene;importjavafx.scene.control.*;importjavafx.scene.layout.*;importjavafx.event.ActionEvent;importjavafx.event.EventHandler;importjavafx.collections.*;importjavafx.stage.Stage;importjavafx.scene.text.Text.*;importjavafx.scene.text.*;publicclassradiobutton_1extendsApplication {// labelsLabel l;// launch the applicationpublicvoidstart(Stage s){// set title for the stages.setTitle("creating RadioButton");// create a tile paneTilePane r =newTilePane();// create a labell =newLabel("This is a Radiobutton example ");// create a toggle groupToggleGroup tg =newToggleGroup();// create radiobuttonsRadioButton r1 =newRadioButton("male");RadioButton r2 =newRadioButton("female");RadioButton r3 =newRadioButton("others");// add radiobuttons to toggle groupr1.setToggleGroup(tg);r2.setToggleGroup(tg);r3.setToggleGroup(tg);// add labelr.getChildren().add(l);r.getChildren().add(r1);r.getChildren().add(r2);r.getChildren().add(r3);// create a sceneScene sc =newScene(r,200,200);// set the scenes.setScene(sc);s.show();}publicstaticvoidmain(String args[]){// launch the applicationlaunch(args);}}Output:

- Program to create RadioButton, add it to a ToggleGroup and add a listener to it: This program creates a RadioButton indicated by the name r1, r2, r3. The radio button will be created inside a scene, which in turn will be hosted inside a stage (which is the top level JavaFX container). The function setTitle() is used to provide title to the stage. A toggle group is created and the radio buttons are added to the toggle group using setToggleGroup() function. A label l2 is created to show which radio button is selected. A change listener is added to handle any change in the selection of the radio buttons (using the addListener() function). The change in selection is depicted by changing the text of label l2. Then a tile-pane is created, on which addChildren() method is called to attach the radio button inside the scene, along with the resolution specified by (200, 200) in the code. Finally, the show() method is called to display the final results.
// Java Program to create RadioButton, add it to a ToggleGroup and add a listener to itimportjavafx.application.Application;importjavafx.scene.Scene;importjavafx.scene.control.*;importjavafx.scene.layout.*;importjavafx.event.ActionEvent;importjavafx.event.*;importjavafx.collections.*;importjavafx.stage.Stage;importjavafx.scene.text.Text.*;importjavafx.scene.text.*;importjavafx.beans.value.*;publicclassradiobutton_2extendsApplication {// launch the applicationpublicvoidstart(Stage s){// set title for the stages.setTitle("creating RadioButton");// create a tile paneTilePane r =newTilePane();// create a labelLabel l =newLabel("This is a Radiobutton example ");Label l2 =newLabel("nothing selected");// create a toggle groupToggleGroup tg =newToggleGroup();// create radiobuttonsRadioButton r1 =newRadioButton("male");RadioButton r2 =newRadioButton("female");RadioButton r3 =newRadioButton("others");// add radiobuttons to toggle groupr1.setToggleGroup(tg);r2.setToggleGroup(tg);r3.setToggleGroup(tg);// add labelr.getChildren().add(l);r.getChildren().add(r1);r.getChildren().add(r2);r.getChildren().add(r3);r.getChildren().add(l2);// create a sceneScene sc =newScene(r,200,200);// add a change listenertg.selectedToggleProperty().addListener(newChangeListener<Toggle>(){publicvoidchanged(ObservableValue<?extendsToggle> ob,Toggle o, Toggle n){RadioButton rb = (RadioButton)tg.getSelectedToggle();if(rb !=null) {String s = rb.getText();// change the labell2.setText(s +" selected");}}});// set the scenes.setScene(sc);s.show();}publicstaticvoidmain(String args[]){// launch the applicationlaunch(args);}}Output:

Note: The above programs will not run in an online IDE please use an offline compiler
Reference: https://docs.oracle.com/javase/8/javafx/api/javafx/scene/control/RadioButton.htmlAttention reader! Don’t stop learning now. Get hold of all the important Java Foundation and Collections concepts with the Fundamentals of Java and Java Collections Course at a student-friendly price and become industry ready. To complete your preparation from learning a language to DS Algo and many more, please refer Complete Interview Preparation Course.