JavaFX | Оповещение с примерами
Оповещение является частью JavaFX и является подклассом класса Dialog. Предупреждения - это некоторые предопределенные диалоговые окна, которые используются для отображения некоторой информации пользователю. Оповещения в основном относятся к конкретным типам оповещений:
- Предупреждение «ПОДТВЕРЖДЕНИЕ»: тип предупреждения «ПОДТВЕРЖДЕНИЕ» настраивает диалоговое окно «Предупреждение» таким образом, чтобы предполагалось, что содержимое диалогового окна требует подтверждения от пользователя.
- Предупреждение WARNING: тип предупреждения WARNING настраивает диалоговое окно Alert таким образом, чтобы предполагалось, что содержимое диалогового окна предупреждает пользователя о каком-либо факте или действии.
- Предупреждение NONE: Тип предупреждения NONE не имеет эффекта, не устанавливая никаких свойств по умолчанию в предупреждении.
- Предупреждение «ИНФОРМАЦИЯ»: тип предупреждения «ИНФОРМАЦИЯ» настраивает диалоговое окно «Предупреждение» таким образом, чтобы предполагалось, что содержимое диалогового окна информирует пользователя о некоторой части информации.
- Предупреждение ERROR: тип предупреждения ERROR настраивает диалоговое окно Alert таким образом, чтобы оно предполагало, что что-то пошло не так.
Предупреждение состоит из 3 частей:
- Заголовок
- Текст содержания
- Кнопки подтверждения
Конструкторами класса являются:
- Alert (Alert.AlertType a) : создает новое предупреждение с указанным типом предупреждения.
- Alert (Alert.AlertType a, String c, ButtonType… b) : создает новое предупреждение с указанным типом предупреждения, содержимым и типом кнопки.
Обычно используемые методы:
| метод | объяснение |
|---|---|
| getAlertType () | установить указанный тип предупреждения |
| setAlertType (Alert.AlertType a) | установить указанный тип оповещения для оповещения |
| getButtonTypes () | Возвращает ObservableList всех экземпляров ButtonType, которые в настоящее время установлены внутри этого экземпляра Alert. |
| setContentText (String s) | устанавливает контекстный текст для предупреждения |
| getContentText () | возвращает текст содержимого для предупреждения. |
Below programs illustrate the Alert class:
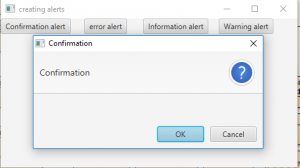
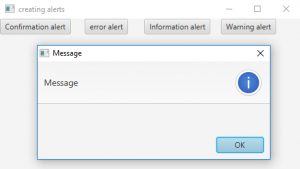
- Program to create alert of different types and display them: This program creates an alert which is of default type. The alert would be changed to different alert types when required. This program creates a Buttons indicated by the name b, b1, b2, b3. The buttons will be created inside a scene, which in turn will be hosted inside a stage. We would create a label to show if the button is pressed or not. The function setTitle() is used to provide title to the stage. Then a tile pane is created, on which addChildren() method is called to attach the button and label inside the scene. Finally, the show() method is called to display the final results.we would create an event handler to handle the button events. The event handler would be added to the button using setOnAction() function. When the buttons are pressed they will display the respective alerts associated with them and will set the respective alertType using the function setAlertType() function.
Java
// Java Program to create alert of different// types and display themimport javafx.application.Application;import javafx.scene.Scene;import javafx.scene.control.Button;import javafx.scene.layout.*;import javafx.event.ActionEvent;import javafx.event.EventHandler;import javafx.scene.control.*;import javafx.stage.Stage;import javafx.scene.control.Alert.AlertType;public class Alert_1 extends Application { // launch the application public void start(Stage s) { // set title for the stage s.setTitle("creating alerts"); // create a button Button b = new Button("Confirmation alert"); Button b1 = new Button("error alert"); Button b2 = new Button("Information alert"); Button b3 = new Button("Warning alert"); // create a tile pane TilePane r = new TilePane(); // create a alert Alert a = new Alert(AlertType.NONE); // action event EventHandler<ActionEvent> event = new EventHandler<ActionEvent>() { public void handle(ActionEvent e) { // set alert type a.setAlertType(AlertType.CONFIRMATION); // show the dialog a.show(); } }; // action event EventHandler<ActionEvent> event1 = new EventHandler<ActionEvent>() { public void handle(ActionEvent e) { // set alert type a.setAlertType(AlertType.ERROR); // show the dialog a.show(); } }; // action event EventHandler<ActionEvent> event2 = new EventHandler<ActionEvent>() { public void handle(ActionEvent e) { // set alert type a.setAlertType(AlertType.INFORMATION); // show the dialog a.show(); } }; // action event EventHandler<ActionEvent> event3 = new EventHandler<ActionEvent>() { public void handle(ActionEvent e) { // set alert type a.setAlertType(AlertType.WARNING); // show the dialog a.show(); } }; // when button is pressed b.setOnAction(event); b1.setOnAction(event1); b2.setOnAction(event2); b3.setOnAction(event3); // add button r.getChildren().add(b); r.getChildren().add(b1); r.getChildren().add(b2); r.getChildren().add(b3); // create a scene Scene sc = new Scene(r, 200, 200); // set the scene s.setScene(sc); s.show(); } public static void main(String args[]) { // launch the application launch(args); }} |
- Output:


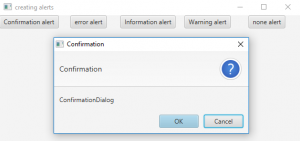
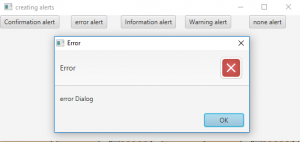
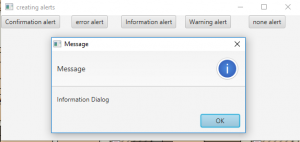
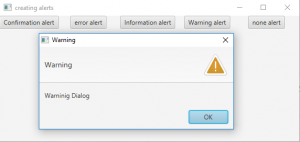
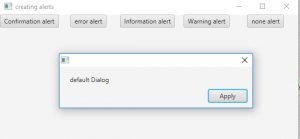
- Program to create alert and set different alert types and button type and also set different content text: This program creates an alert which is of default type. the alert would be changed to different alert types when required. This program creates a Buttons indicated by the name b, b1, b2, b3, b4. The buttons will be created inside a scene, which in turn will be hosted inside a stage. We would create a label to show if the button is pressed or not. The function setTitle() is used to provide title to the stage. Then a tile pane is created, on which addChildren() method is called to attach the button and label inside the scene. Finally, the show() method is called to display the final results.we would create an event handler to handle the button events. The event handler would be added to the button using setOnAction() function. When the buttons are pressed they will display the respective alerts associated with them and will set the respective alertType using the function setAlertType() function. The content text would also be changed using the setContentText() method .we would create a new alert for the 4th button which is of default type, and also set a button type using the constructor of alert.
Java
// Java Program to create alert and set// different alert types and button type// and also set different content textimport javafx.application.Application;import javafx.scene.Scene;import javafx.scene.control.Button;import javafx.scene.layout.*;import javafx.event.ActionEvent;import javafx.event.EventHandler;import javafx.scene.control.*;import javafx.stage.Stage;import javafx.scene.control.Alert.AlertType;public class Alert_2 extends Application { // launch the application public void start(Stage s) { // set title for the stage s.setTitle("creating alerts"); // create a button Button b = new Button("Confirmation alert"); Button b1 = new Button("error alert"); Button b2 = new Button("Information alert"); Button b3 = new Button("Warning alert"); Button b4 = new Button("none alert"); // create a tile pane TilePane r = new TilePane(); // create a alert Alert a = new Alert(AlertType.NONE); // action event EventHandler<ActionEvent> event = new EventHandler<ActionEvent>() { public void handle(ActionEvent e) { // set alert type a.setAlertType(AlertType.CONFIRMATION); // set content text a.setContentText("ConfirmationDialog"); // show the dialog a.show(); } }; // action event EventHandler<ActionEvent> event1 = new EventHandler<ActionEvent>() { public void handle(ActionEvent e) { // set alert type a.setAlertType(AlertType.ERROR); // set content text a.setContentText("error Dialog"); // show the dialog a.show(); } }; // action event EventHandler<ActionEvent> event2 = new EventHandler<ActionEvent>() { public void handle(ActionEvent e) { // set alert type a.setAlertType(AlertType.INFORMATION); // set content text a.setContentText("Information Dialog"); // show the dialog a.show(); } }; // action event EventHandler<ActionEvent> event3 = new EventHandler<ActionEvent>() { public void handle(ActionEvent e) { // set alert type a.setAlertType(AlertType.WARNING); // set content text a.setContentText("Warning Dialog"); // show the dialog a.show(); } }; // action event EventHandler<ActionEvent> event4 = new EventHandler<ActionEvent>() { public void handle(ActionEvent e) { Alert a1 = new Alert(AlertType.NONE, "default Dialog",ButtonType.APPLY); // show the dialog a1.show(); } }; // when button is pressed b.setOnAction(event); b1.setOnAction(event1); b2.setOnAction(event2); b3.setOnAction(event3); b4.setOnAction(event4); // add button r.getChildren().add(b); r.getChildren().add(b1); r.getChildren().add(b2); r.getChildren().add(b3); r.getChildren().add(b4); // create a scene Scene sc = new Scene(r, 200, 200); // set the scene s.setScene(sc); s.show(); } public static void main(String args[]) { // launch the application launch(args); }} |
- Output:
- https://docs.oracle.com/javase/8/javafx/api/javafx/scene/control/Alert.html
- https://docs.oracle.com/javase/8/javafx/api/javafx/scene/control/Alert.AlertType.html
Вниманию читателя! Не переставай учиться сейчас. Ознакомьтесь со всеми важными концепциями Java Foundation и коллекций с помощью курса "Основы Java и Java Collections" по доступной для студентов цене и будьте готовы к работе в отрасли. Чтобы завершить подготовку от изучения языка к DS Algo и многому другому, см. Полный курс подготовки к собеседованию .