Анимация флип-карты в Android
В этой статье мы рассмотрим, как создать приложение Flip Card Animation в Android Studio. Анимация делает наше приложение более привлекательным, убедительным и удобным для пользователя. Образец GIF приведен ниже, чтобы получить представление о том, что мы собираемся делать в этой статье. Обратите внимание, что мы будем использовать Kotlin в качестве языка программирования.
Пошаговая реализация
Шаг 1: Создайте новый проект
Чтобы создать новый проект в Android Studio, обратитесь к разделу «Как создать/запустить новый проект в Android Studio». Обратите внимание, что в качестве языка программирования выберите Java .
Шаг 2: Работа с файлом activity_main.xml
Перейдите в res > layout > файл activity_main.xml и добавьте в этот файл приведенный ниже код. Ниже приведен код файла activity_main.xml. Комментарии добавляются внутри кода, чтобы понять код более подробно.
XML
<?xml version="1.0" encoding="utf-8"?><!--We are going to use Constraintlayout--><androidx.constraintlayout.widget.ConstraintLayout android:layout_width="match_parent" android:layout_height="match_parent" tools:context=".MainActivity"> <!--Add a textView for front part of the card--> <TextView android:id="@+id/card_back" android:layout_width="300dp" android:layout_height="300dp" android:textAlignment="center" android:gravity="center" android:text="Back Card" android:textSize="22sp" android:background="#BF3030" app:layout_constraintBottom_toBottomOf="parent" app:layout_constraintLeft_toLeftOf="parent" app:layout_constraintRight_toRightOf="parent" app:layout_constraintTop_toTopOf="parent" /> <!--Add a textview for back part of the card--> <TextView android:id="@+id/card_front" android:layout_width="300dp" android:layout_height="300dp" android:textAlignment="center" android:gravity="center" android:text="Front Card" android:textSize="22sp" android:background="#326314" app:layout_constraintBottom_toBottomOf="parent" app:layout_constraintLeft_toLeftOf="parent" app:layout_constraintRight_toRightOf="parent" app:layout_constraintTop_toTopOf="parent" /> <!--Add a Button that will apply flip on the card--> <Button android:id="@+id/flip_btn" android:layout_width="wrap_content" android:layout_height="wrap_content" android:text="Flip Me" tools:ignore="MissingConstraints" android:layout_marginTop="380dp" tools:layout_editor_absoluteX="142dp" tools:layout_editor_absoluteY="559dp" app:layout_constraintBottom_toBottomOf="parent" app:layout_constraintLeft_toLeftOf="parent" app:layout_constraintRight_toRightOf="parent" app:layout_constraintTop_toTopOf="parent"/> </androidx.constraintlayout.widget.ConstraintLayout> |
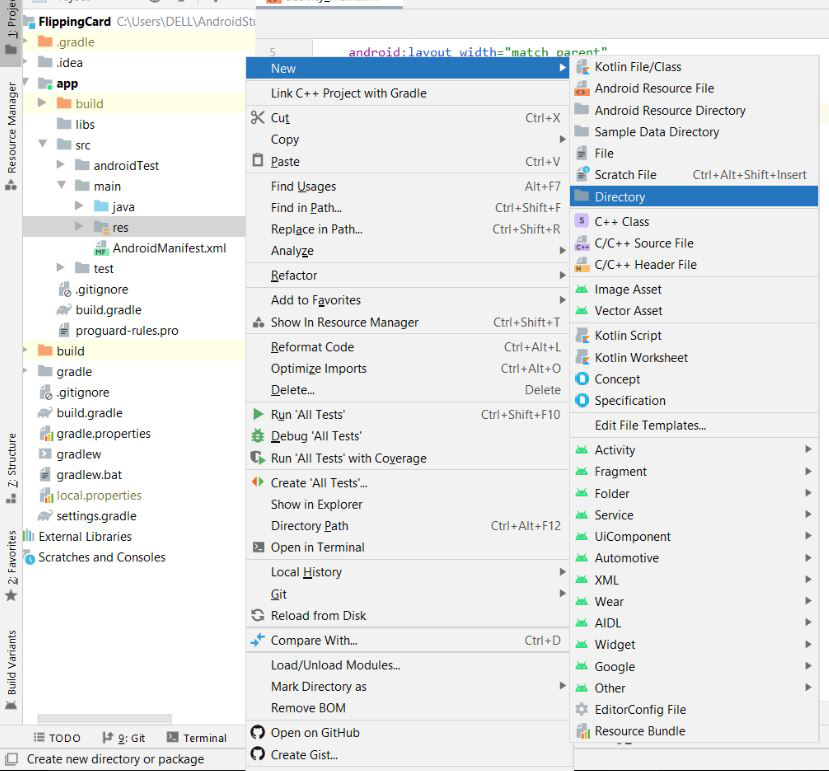
Шаг 3: Создайте новый каталог
Создайте новый каталог с именем animator , где мы будем работать с передней и задней частями карты. Чтобы создать новый каталог, следуйте изображениям, приведенным ниже.

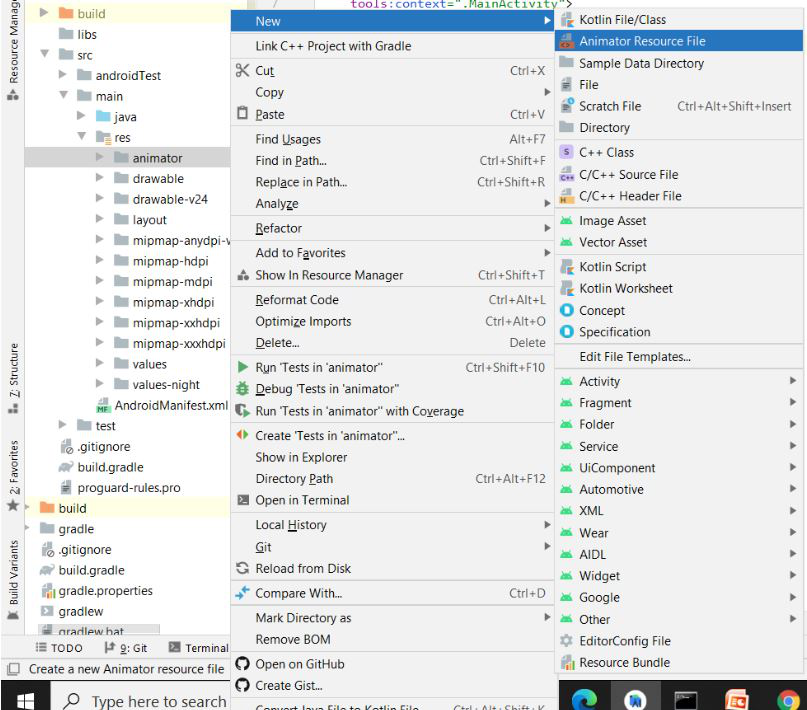
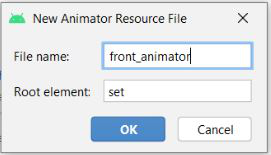
Шаг 4: Создайте новый файл ресурсов аниматора
Создайте новый файл ресурсов аниматора с именем front_animator.xml , который будет обрабатывать лицевую анимацию флип-карты. Чтобы создать новый файл ресурсов аниматора, следуйте изображениям, приведенным ниже.
Шаг 5: Работа с файлом front_animator.xml
Перейдите к res > animator > front_animator.xml и добавьте приведенный ниже код в этот файл. Здесь мы будем использовать тег objectAnimator для анимации передней части переворачивающейся карты. Ниже приведен код файла front_animator.xml .
XML
<?xml version="1.0" encoding="utf-8"?> <objectAnimator android:valueFrom="0" android:valueTo="180" android:propertyName="rotationY" android:duration="1000" /> <objectAnimator android:valueFrom="1.0" android:valueTo="0.0" android:propertyName="alpha" android:startOffset="500" android:duration="1" /></set> |
Шаг 6. Снова создайте новый файл ресурсов аниматора
Снова создайте новый файл ресурсов аниматора с именем back_animator.xml , который будет обрабатывать анимацию задней части флип-карты. Чтобы создать новый файл ресурсов аниматора, следуйте тем же изображениям, которые были показаны ранее для создания файла front_animator.xml .
Шаг 7: Работа с файлом back_animator.xml
Перейдите к res > animator > back_animator.xm l и добавьте приведенный ниже код в этот файл. Здесь мы будем использовать тег objectAnimator для анимации передней части переворачивающейся карточки. Ниже приведен код файла back_animator.xml .
XML
<?xml version="1.0" encoding="utf-8"?> <objectAnimator android:valueFrom="1.0" android:valueTo="0.0" android:propertyName="alpha" android:duration="0" /> <objectAnimator android:valueFrom="180" android:valueTo="0" android:propertyName="rotationY" android:repeatMode="reverse" android:duration="1000" /> <objectAnimator android:valueFrom="0.0" android:valueTo="1.0" android:propertyName="alpha" android:startOffset="500" android:duration="0" /> </set> |
Шаг 8: Работа с файлом MainActivity.kt
Перейдите к файлу MainActivity.kt и добавьте в него приведенный ниже код. Ниже приведен код файла MainActivity.kt . Здесь мы увидим, как работать с передней и задней анимационными частями флип-карты. Комментарии добавляются внутри кода, чтобы понять код более подробно.
Kotlin
package com.example.flippingcard import android.animation.AnimatorInflaterimport android.animation.AnimatorSetimport androidx.appcompat.app.AppCompatActivityimport android.os.Bundleimport android.widget.Buttonimport android.widget.TextView class MainActivity : AppCompatActivity() { lateinit var front_anim:AnimatorSet lateinit var back_anim: AnimatorSet var isFront =true override fun onCreate(savedInstanceState: Bundle?) { super.onCreate(savedInstanceState) setContentView(R.layout.activity_main) // Now Create Animator Object // For this we add animator folder inside res // Now we will add the animator to our card // we now need to modify the camera scale var scale = applicationContext.resources.displayMetrics.density val front = findViewById<TextView>(R.id.card_front) as TextView val back =findViewById<TextView>(R.id.card_back) as TextView val flip = findViewById<Button>(R.id.flip_btn) as Button front.cameraDistance = 8000 * scale back.cameraDistance = 8000 * scale // Now we will set the front animation front_animation = AnimatorInflater.loadAnimator(applicationContext, R.animator.front_animator) as AnimatorSet back_animation = AnimatorInflater.loadAnimator(applicationContext, R.animator.back_animator) as AnimatorSet // Now we will set the event listener flip.setOnClickListener{ if(isFront) { front_animation.setTarget(front); back_animation.setTarget(back); front_animation.start() back_animation.start() isFront = false } else { front_animation.setTarget(back) back_animation.setTarget(front) back_animation.start() front_animation.start() isFront =true } } }} |
Выход:
Вы можете получить исходный код проекта по этой ссылке:Нажмите здесь