Как создать погодного бота в Telegram с помощью JavaScript?
С помощью бота Telegram можно узнать полную информацию о погоде в любом городе, штате или стране, не заходя в другое приложение. Telegram предоставляет набор методов API для выполнения различных функций. Вы можете использовать API бота Telegram для создания чат-бота, который возвращает информацию о погоде о городе, штате или стране на основе параметров и команд, отправленных боту.
Предпосылки:
- Знание JavaScript и настройка среды узлов.
- Последняя версия Node (версия> 10)
- Последняя версия npm (версия> 6)
Команда для проверки наличия в вашей системе Node и npm:
 $ npm --v
6.14.5

$ node --version
Версия 10.15.0
Создание бота и получение токена API:
- Откройте приложение Telegram и найдите @BotFather.
- Нажмите кнопку «Пуск» или отправьте «/ start».
- Затем отправьте сообщение «/ newbot», чтобы указать имя и имя пользователя.
- Затем BotFather предоставит вам токен API.
Получение ключа API погоды:
- Перейдите на сайт Открытой карты погоды.
- Создайте учетную запись в соответствии с лимитом.
- Вы получите собственный ключ API.
- Прочтите документацию, если вы хотите использовать другие параметры вместо названия города.
Установка модулей:
Запросы на установку и node-telegram-bot-api (модуль Node.js для взаимодействия с официальным Telegram Bot API)
$ npm install - сохранить запросы node-telegram-bot-api

Имя файла: weather.js
Javascript
// Requiring modulesvar TelegramBot = require( 'node-telegram-bot-api' )var request = require( 'request' )// Token obtained from bot fathervar token = "YOUR_TELEGRAM_BOT_TOKEN"var bot = new TelegramBot(token, { polling: true });// Create a bot that uses 'polling' to// fetch new updatesbot.on( "polling_error" , (err) => console.log(err));// The 'msg' is the received Message from user and// 'match' is the result of execution above// on the text contentbot.onText(//city (.+)/, function (msg, match) { // Getting the name of movie from the message // sent to bot var city = match[1]; var chatId = msg.chat.id var query = + city + '&appid=YOUR_WEATHER_API_KEY' // Key obtained from openweathermap API request(query, function (error, response, body) { if (!error && response.statusCode == 200) { bot.sendMessage(chatId, '_Looking for details of_ ' + city + '...' , { parse_mode: "Markdown" }) .then(msg) { res = JSON.parse(body) var temp = Math.round((parseInt( res.main.temp_min) - 273.15), 2) // Kelvin to celsius and then round // off and conversion to atm var pressure = Math.round(parseInt( res.main.pressure) - 1013.15) var rise = new Date(parseInt( res.sys.sunrise) * 1000); var set = new Date(parseInt( res.sys.sunset) * 1000); // Unix time to IST time conversion bot.sendMessage(chatId, '**** ' + res.name + ' ****
Temperature: ' + String(temp) + '°C
Humidity: ' + res.main.humidity + ' %
Weather: ' + res.weather[0].description + '
Pressure: ' + String(pressure) + ' atm
Sunrise: ' + rise.toLocaleTimeString() + '
Sunset: ' + set.toLocaleTimeString() + '
Country: ' + res.sys.country) } // Sending back the response from // the bot to user. The response // has many other details also // which can be used or sent as // per requirement } })}) |
Шаги по запуску программы: Запустите файл weather.js с помощью следующей команды:
$ node weather.js
Перейдите к своему боту и введите / city city-name и посмотрите результаты.
Выход:
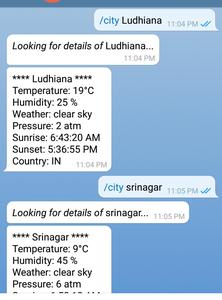
Информация о погоде с помощью бота Telegram