Изменить цвет кнопки в Kivy
Kivy - это платформенно-независимый инструмент с графическим интерфейсом на Python. Поскольку он может работать на Android, IOS, Linux и Windows и т. Д. Он в основном используется для разработки приложений Android, но это не означает, что его нельзя использовать в приложениях для настольных компьютеров.
В этой статье мы узнаем, как изменить цвет кнопки в kivy. Существует свойство с именем background_color, которое используется для изменения цвета кнопки в kivy python.
background_color – The background-color kivy property sets the background color of an element. It is specified as a single color value.
Syntax: background_color: 1, 0, 0, 1
Примечание: по умолчанию цвет кнопки черный (немного серый), если вы хотите его изменить, мы используем это свойство. И оно принимает только значение от 0 до 1, любое другое указанное значение приведет к неправильному поведению программы.
Basic Approach to follow while changing button color:
1) import kivy
2) import kivyApp
3) import all needed
4) set minimum version(optional)
5) Add widgets
6) Add buttons at set their colors
6) Extend the class
7) Return layout
8) Run an instance of the class
Kivy Tutorial – Learn Kivy with Examples.
Ниже приведен код, как изменить цвет кнопки:
Code 1#
def build(self): # use a (r, g, b, a) tuple btn = Button(text ="Push Me !", font_size ="20sp", # Here you can give the color # The value must be between 0 to 1 # greyish black color background_color =(1, 1, 1, 1), size =(32, 32), size_hint =(.2, .2), pos =(300, 250)) return btn |
Code #2
## Sample Python application demonstrating the ## How to change button color in Kivy.################################################### # import kivy module import kivy # to choose the colors randomly # every time you run it shows different color import random # this restricts the kivy version i.e # below this kivy version you cannot # use the app or software kivy.require("1.9.1") # base Class of your App inherits from the App class. # app:always refers to the instance of your application from kivy.app import App # creates the button in kivy # if not imported shows the error from kivy.uix.button import Button # BoxLayout arranges children in a vertical or horizontal box. # or help to put the children at the desired location. from kivy.uix.boxlayout import BoxLayout # declaring the colours you can use directly also red = [1, 0, 0, 1] green = [0, 1, 0, 1] blue = [0, 0, 1, 1] purple = [1, 0, 1, 1] # class in which we are creating the button class ChangeColorApp(App): def build(self): superBox = BoxLayout(orientation ="vertical") HB = BoxLayout(orientation ="horizontal") # creating the list of defined colors colors = [red, green, blue, purple] # Changing the color of buttons # here you can see how you can change the color btn1 = Button(text ="One", # Color of button is changed not default background_color = random.choice(colors), font_size = 32, size_hint =(0.7, 1)) btn2 = Button(text ="Two", background_color = random.choice(colors), font_size = 32, size_hint =(0.7, 1)) HB.add_widget(btn1) HB.add_widget(btn2) VB = BoxLayout(orientation ="vertical") btn3 = Button(text ="Three", background_color = random.choice(colors), font_size = 32, size_hint =(1, 10)) btn4 = Button(text ="Four", background_color = random.choice(colors), font_size = 32, size_hint =(1, 15)) VB.add_widget(btn3) VB.add_widget(btn4) superBox.add_widget(HB) superBox.add_widget(VB) return superBox # creating the object root for App class root = ChangeColorApp() # run function runs the whole program # i.e run() method which calls the # target function passed to the constructor. root.run() |
Output: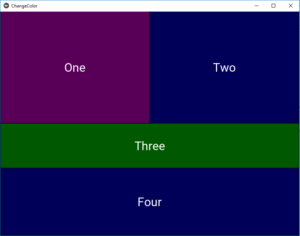
Attention geek! Strengthen your foundations with the Python Programming Foundation Course and learn the basics.
To begin with, your interview preparations Enhance your Data Structures concepts with the Python DS Course. And to begin with your Machine Learning Journey, join the Machine Learning – Basic Level Course

- Picked
- Python-gui
- Python-kivy
- Python